Our lab recently started using the ML prep, and I’ve been struggling to get reliable pipetting at low volumes (1µL) using the 50µL tip and the independent channel pipettes.
I found some advice scattered over many posts and was hoping to get some clarity and hopefully gather useful tips in this post.
Here are some questions:
What is the lower pipetting limit? As far as I can tell from the marketing material, it is 1µL. However, the software allows selecting lower volumes, and I managed to reliably dispense 0.5µL using the 8MHP. When I use the 2 channel, the pipetting is extremely inconsistent though.
I learned from experience with PCR plates and now from reading other people’s comments here that the liquid detection does not work for volumes bellow 50µL. Is there some official guideline for that? or is it labware dependent?
It seems that the key to good pipetting of low volumes is in fine tuning the liquid definitions. Could anyone share their settings if they work well?
On that note, could someone explain what “Swap speed”, “Settling time” and “Air transport” mean? And when one might need to tweak them.
Hamilton’s liquid editing eBook lists low volume with 1000 uL channels as 0.5 - 20 uL, so that’s likely a good starting place.
Whatever you can verify with accuracy and reproducibility is your true lower limit - it depends too much on your lab conditions and reagents. Same with cLLD minimum volume.
Some practical advice: For low volume, stick with wet contact, minimize submerge depth, pre-wet tips and possibly aspirate higher leading airgap to help overcome capillary effect in the tubes. Reduce Stop Flow rate to 0-10, and make sure your labware is well framed/defined in the software.
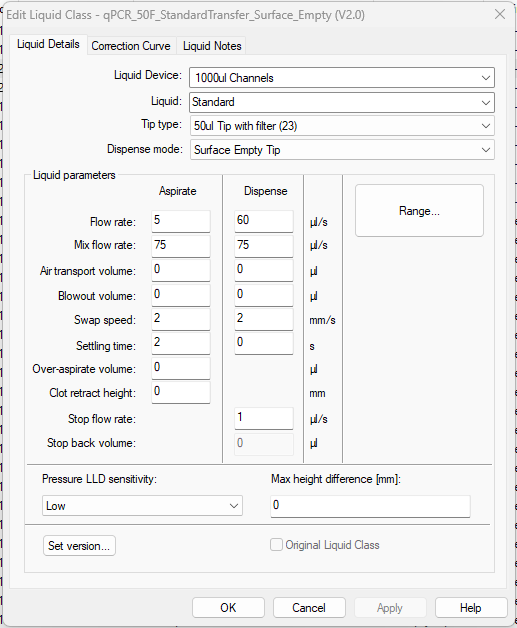
Here’s a picture of an LC I use for 2 uL transfers during qPCR. Also for reference, I tend to get cLLD volume detection in PCR plates to about 10-15uL when the PCR plate is nested in the Hamilton 96PCR carriers.
I’ll let some of the true pros chime in on the definitions, but you can also always click that help button at the bottom-right of the LC screen to get some idea of what those settings do and their value ranges.
@evwolfson has some fantastic explanations for pipetting. here are the definitions that you asked for.
Swap Speed:
Speed in mm/s at which the dispensing head is drawn up out of the liquid.
Slower (1-2mm/s) for more viscous fluids and faster (10-100mm/s) for more volatile fluids
Settling Time:
Time the dispensing head remains in the liquid after aspirating or dispensing.
Shorter (0-2s) for aqueous solutions, even shorter (0-1s) for highly volatile solutions and longer (2-9.9s) for viscous solutions
Air Transport Volume:
Aspirated at the end of the aspiration and dispense steps and automatically dispensed again as an extra volume in the first part of the dispense step. If you have clear tips you can see this happening.
Can help prevent droplet formation. Bigger is not always better as it could cause leaks.
Hello, I am a Product Specialist for the Microlab Prep and can provide some answers for you to build off of the helpful information @evwolfson and @Christina provided.
The pipetting specifications and recommended pipetting range for both the 8 MPH and independent channels on the Prep is 1 - 1000 µL, however, the software does allow you to select down to 0.1 µl.
The minimum detectable volume for cLLD is application dependent and can vary based on factors such as the labware geometry, liquid type, and proximity to the cLLD base plate on the deck. As general guidance, the minimum recommended volume is approximately 50 µL in a 96‑well PCR plate, 75 µL in a 96 well flat‑bottom microplate, and 200 µL in a 16 mm × 100 mm tube. Liquid level detection in PCR plates may be improved when using cLLD adapters. We have a few adapters available for the Prep (apologies, I am limited to 2 links in a post, so I can’t add a direct link here).
For liquids that cannot be reliably detected with cLLD, it is recommended to set the pipetting height using the “Above container bottom” setting, which disables cLLD. Selecting a height “Below liquid level” automatically enables cLLD.
This article on our Knowledge Base provides some suggestions for improving your pipetting results and defines the liquid parameters. In the Prep software, you can also tap the “?” icon in the top right hand corner to provide a contextual help menu for options on the screen. I would suggest submitting a technical support ticket and our Product Support team can review your protocol and provide specific suggestions based on your applications and settings. When submitting the ticket, select Benchtop and Handheld Device for “Product Type” and then you can select the Microlab Prep on the next page: https://www.hamiltoncompany.com/contact?contact-type=technical-support
Please note that this document is more applicable to the larger Hamilton liquid handlers (NIMBUS, STAR, VANTAGE). My understanding is that the Prep does not offer as much granular control of the liquid classes, but many of the concepts are the same.
Just to clarify a bit, the Prep UI exposes the primary parameters that are used for dialing in pipetting. The remaining parameters from the liquid handling guide are also present behind the scenes and can be tweaked as importable liquid class when working with our Product Support team as @n.roberts referenced above. The team will work with you to provide classes with the specific parameters you will need based on your application.