I have some trouble understanding the logic behind correction curves for aliquoting. I read through the other posts and the information in Hamiltons Liquid Handling reference guide but I still do not fully understand the logic, especially when pre- and post dispensation volumes are used.
Let’s say I want to do an aliquot transfer (5 steps with 140 uL, and 50 uL Pre-/ and post dispensation volume). Which data points (target volumes) do I have to use for the correction curve?
Option 1: The volumes of the added aliquot steps + the total volume including the volume for the pre- /post- aliquot steps. → (140, 280, 420, 560, 700, 800)
Option 2: Account for the actual liquid level during the transfer (50, 190, 330, 470, 610, 750, 800)
Further: What happens if my actual liquid level for one transfer step is between two target volumes of the correction curve. How is the step calculated?
Maybe could somebody clarify what the actual logic behind the correction curve is.
It would be option 2 as you’d have to account for every aliquot: pre, actual, and post. It starts from the top working its way down, so the first aliquot (the pre in your example) would start at 800.
Generally speaking, if you want to have such granular control for each aliquot in a multi-dispense by accounting for each aliquot in the correction curve, you may not even need to have a pre- or post-aliquot. When I host liquid handling trainings, one of the exercises I have trainees do is to create a liquid class for a multi-dispense of 100uL x 3 using 300uL tips. No room for pre- or post-aliquots, but by adjusting the points on the curve for 100, 200, and 300uL, you can achieve consistent transfers.
If you don’t need to have such fine control of each aliquot, then you could essentially zero the correction curve, meaning you have no corrected values for the target volumes. Pre-mix a few cycles with the total volume and then use a pre- and post-aliquot volume that is equal to the volume that you are transferring. This approach may result in suitable performance for your application’s needs.
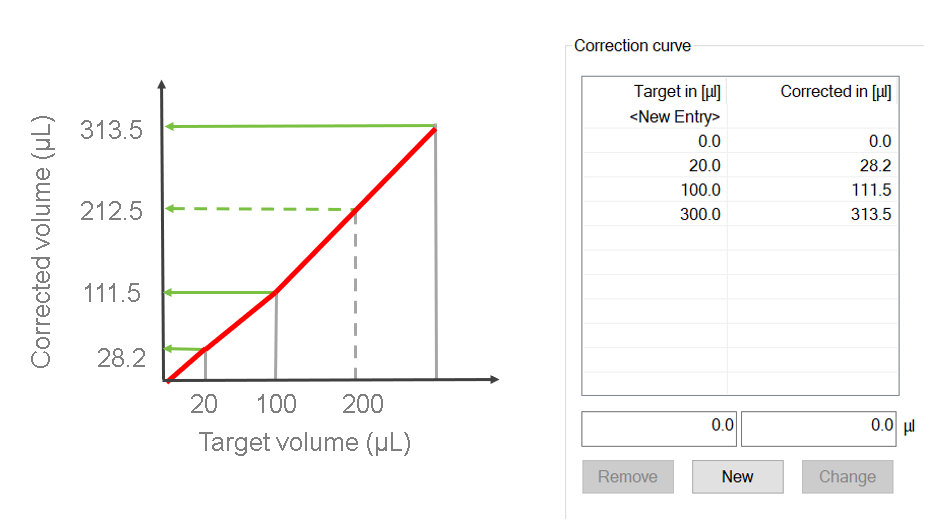
As to your second question, if you don’t have a target volume specified on your correction curve, then its corrected volume would be interpolated between points on the curve. Refer to the example below where 200uL is not set with a corrected value on the curve. If you used this liquid class during runtime and transferred 200uL, its corrected value would be interpolated to be 212.5.
Hi Eric, quick clarification question. Does this also apply when using the “single step” dispense in a loop rather than the aliquot function to perform a multi-dispense? Or do they reference the correction curve differently?
Yes, it applies to multi-dispense steps whether you are using the Smart Step Aliquot or single steps. Another way to look at it is to consider where the plunger is at the start of the dispense step(s).
If you aspirate 300uL and dispense 3 x 100uL, then the first dispense of 100uL has the plunger starting at the corrected value for 300uL and moving down to the corrected value for 200uL. If the volume dispensed is too low, then you would increase the corrected value for 300uL so the plunger is displaced more.