First of all: nice initiative having this group! Exciting to read about different people having the same issues and also getting help.
I was wondering if there is a simple way to estimate the required minimum “rest” volume when pipetting different volumes of various liquids from different glassware types using Hamilton Star.
Concrete: I want to pipette 50 uL from a 0.5 mL (flat bottom) tube using 300 uL tips (Core II disk).
The 0.5 mL is just a standard tube and fits without inserts in the standard 32 sample carrier from Hamilton. I can provide measurements if necessary.
The step is repeated multiple times, so the issue here is not that I pipette 50 uL once, but more the fact that I want to have as little as possible left in the tube at the end. Because we can’t use that in our quantitative analysis anymore, due to evaporation and altered concentrations (liquid behaves differently in target (serum) than in standard (methanol).
So I want to take out an ish-volume that is enough for the amount of transfers, but at the same time not too much, since the leftover can’t be used anymore and has to be dispensed.
I don’t want to have a high rest/dead volume because the liquid is both volatile, expensive and time consuming to make.
However, it is not fully worth it to deduct multiple tests, making calibration curves and so on in order to determine the minimum volume needed.
So I was wondering if there is some kind of simple rule/method or should I just go ahead and try lowering the volume until I get a pipetting error?
Furthermore I was wondering on peoples opinion/experience using coned bottom tubes vs flat bottom tubes.
Especially on the advantages of making the liquid more “accessible” vs. the disadvantage of maybe more likely causing errors due to contact of the pipette tip with the labware.
Hi there,
I don’t have a general rule but what I usually do is have a fixed volume that has to be in the container depending on the geometry and on top of that 10% extra to account for residuals in the tips and so on. This is usually 3 mL fixed for a buffer trough and then (n * amount pipetted * 1.1). Alternatively, you can start with the formula and then increase the fixed amount for your needs. The fixed amount heavily depends on the times you have to pipette and the amount of tips entering the liquid.
best
Dominik
For pipetting 200 uL once from a standard 7 mL sample round bottom tubes with 1000 uL tips we have very good experience of having at least 400 uL volume available. You could probably go a bit down, but we never have had any serious problem with 400 uL.
We do this for serum, since there are no evaporation problems the sample tubes can stand open a while.
We have not been using 300 uL tips yet, plus the already mentioned evaporation and other problems when pipetting standards.
However, I will do something similar and find out what volume works best and post it here when I’m done.
Thanks a lot for the help Dominik!
Und schöne Grüße in den Ruhrpott!
Running tests with a representative aliquot of the liquid, using the intended labware and liquid handling settings will be the best way to characterize dead volume if you truly want to minimize as much as possible. You can mitigate reagent costs during testing by dispensing back into the same container and reusing the liquid.
Regarding your question about tube types, you absolutely want to use a conical bottom tube instead of a flat bottom if you have the option. The dead volume requirement will reduce dramatically, as flat bottom tubes/wells will always incur the maximum dead volume. As long as the labware is defined properly and deck coordinates are accurate, you will not need to worry about tips deviating from center during aspiration and contacting sidewalls.
I’ve had a similar case to have the least amount of residual liquid possible for PCR Mastermixes. Using standard settings I had to use an extra of 6 reaction volumes using a 2 ml Eppendorf tube. I soon learned that Venus miscalculates the volume especially in conical tubes. It is however pretty easy to calculate the actual volume with different liquid levels. Depending on the behavior of the liquid and the liquid class, the extra volume can be reduced tremendously when catching the error and using the actual liquid level set a limit in the method. Basically what I am talking about is a work around that in our case works like a charm.
Don’t use liquid level detection and instead use fixed height aspiration (maybe with a volume measure step beforehand to confirm starting liquid height and that enough liquid is available) with a height adjustment for each aspiration as the liquid level drops. With fixed aspiration you can get away with an insanely low dead volume. I’ve gone as low as 20uL in a Hamilton tube (1.5mL).
Now as far as addressing evaporation I would use a tube that can be opened and closed so try to transition to Hamilton FlipTubes.
Edit: Do note that you will want to use liquid following (try to fix height about 2mm below the actual liquid level). Also be sure to set aspirate mode to “Aspirate All” instead of “Aspirate” so you don’t get insufficient liquid errors.
@BirdBare How would you go about implementing a height adjustment for each aspiration? I’m using worklist with variable but known starting volumes for each parent tube. I keep encountering an insufficient liquid error as the volume nears the bottom of the tube. I’m trying to get as much liquid out of the parent tube as possible. It sounds like your suggestion maybe just what I’m looking for.
You may have forgotten to change the aspiration mode to “Aspirate All.” It will no longer throw the insufficient liquid error.
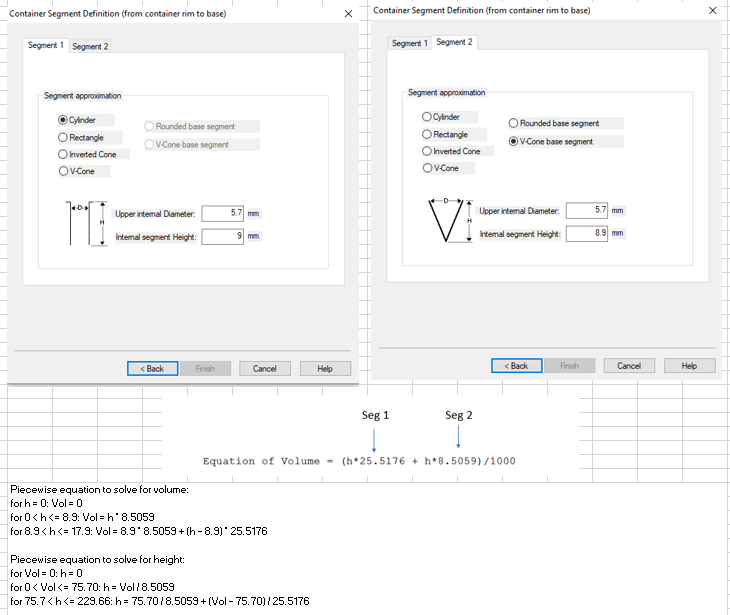
To calculate the height adjustment you can use the container definition to create a piecewise equation. Assuming you have 1500uL in the container and you want to aspirate 15uL 96 times (75L left over) you can calculate the theoretical height for each channel prior to aspiration.
See below image for the equation. NOTE that the equation below is piecewise even though the Hamilton software does not show it as such. Now you can flip the equation to solve for height at a given volume. Boom!
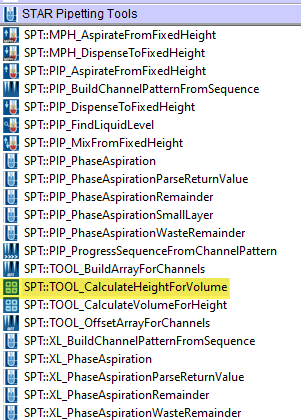
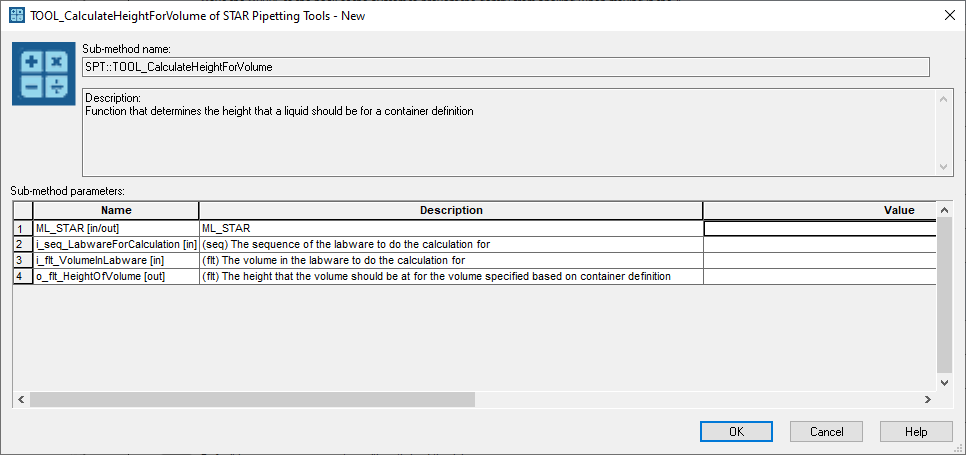
Thanks for this! I’ve used the ComputeContainerVolume in the HSLDev library but found it was incorrect so made the functions myself. I’ll try the STAR pipetting Tools library!! Does the library work in VOV?