IPG set teaching path / use taught path

Hi there,
is there a description / manual somewhere how to teach IPG / iSwap paths? I see there are the option “to_carrier”, “complex movement”, “taught path”. I have some nasty position’s on my deck and sometime’s differing plate heights, and would like to have more control over the IPG to ensure it does not crash into anything. I cannot find anything about it in the manual or on the forum.

I’m planing to integrate a sealer / desealer, centrifuge and capper/decapper outside of the machine. Most of the positions are not a problem, but the sealer give me some trouble:

I’m planing to integrate it below the MPE², a position the iSwap can certainly reach. But the MPE² is higher than the traverse heigth, so I would need a path that approaches the sealer in a straight line from the right. Is this possible to teach somehow?

best,
Dominik

Hi @dominik.b

You shouldn’t need to teach a custom IPG path to safely reach this location.

Once the IPG has gripped a plate and returned to labware traverse height, there are two main considerations:

  • Location of the arm when the IPG rotates into the needed grip direction for the ‘PlacePlate’ step (avoid rotating into the MPE while preparing final grip direction)
  • Y drive location of the IPG as it approaches the sealer (ensure MPE is North of IPG during final X approach)

Here is what I would do:

Use a standard GetPlate step, using default grip direction using the skinny side (this will preserve the required labware orientation when placing to the sealer)

Use MoveMPH step to move the arm to a safe X position fully clear to the right of the MPE. For the grip direction required by the PlacePlate step, the IPG will need to rotate to full extension - this arm movement will ensure clearance without parking the IPG.

image

Use complex (hotel) movement in the PlacePlate step. When using a retract distance of 139mm or more, full IPG extension will be forced. This will also stage the IPG in the required Y position atleast 139mm right of the target (in X).

For retrieving the plate from the sealer, call the MoveMPH step before the GetPlate step, using the same complex movement parameters in the GetPlate step that were used in the previous PlacePlate step.

Hope this helps.

-Nick

2 Likes

Thanks @NickHealy_Hamilton , makes total sense :slight_smile: This will solve my specific problem here. Still one question remains: Is it possible to teach a custom path anyways?

€: Or to formulate differently, just to make sure I get the logic correctly.

  1. The ISWAP will first perform all rotations needed to be able to get / place a specific labware. This will happen at the position the pipetting arm is at that particular moment.
  2. The arm will move in X direction and grab the plate, ISWAP will then move to traveling height.
  3. The arm will perform the rotations needed for the place command without moving in X.
  4. It will move in X to place the plate.

Hi @dominik.b

No problem.

Your understanding of the IPG rotation semantics is correct.

Regarding teaching of custom IPG paths, this is a brand-new feature implemented as of VENUS 6.2, which allows full control of drive positions and grip directions during execution of custom IPG movements to get or place a plate in very challenging locations and situations.

That said, we are currently working with the software team to add some features I think are important to include in order to make the process more intuitive and seamless during teaching and runtime execution.

For the time being, as your transport scenario can be overcome without custom paths, I would recommend holding off until some features are added. When this is available I will be sure to update with more information and instruction.

Thanks.

-Nick

2 Likes

Thank you, Nick. We’re looking forward to the update. It’s great to see that you’re still investing so much in further development—other vendors could certainly take a leaf out of your book.

1 Like

Hi Nick, I know this is a year later.
How do you access the transport paths editor?
The manual mentions it being under the tools dropdown menu from the method editor, but it is not present there currently. We are running Venus 6.3.
I would be nice to have the transport paths editor for custom paths for tricky labware.

Hi @serg

To access the paths editor UI simply:

Open your deck layout of interest
Right click on any .rck (plate) labware on the deck, but I recommend right clicking on the labware you intend to use as a source plate for the IPG to load for teaching
Select ‘Transport paths editor’ from the context menu

For the plate used during teaching, ensure that the labware definition has grip segments defined for the full height of the labware. This is required for IPG path teaching to function.

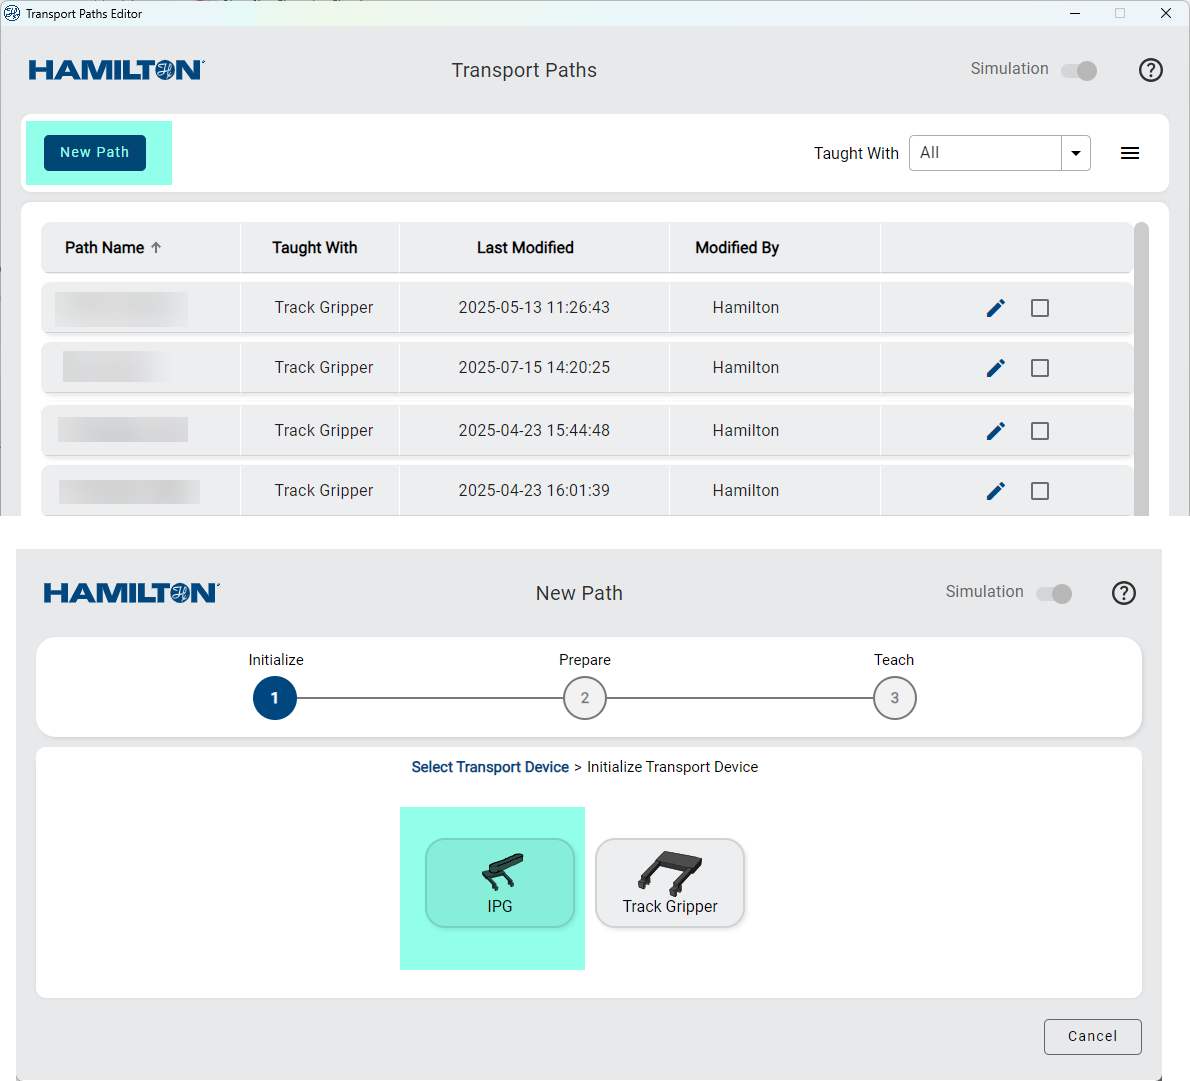
Once the teaching client UI is launched, toggle simulation off and then select ‘New Path’ followed by ‘IPG’

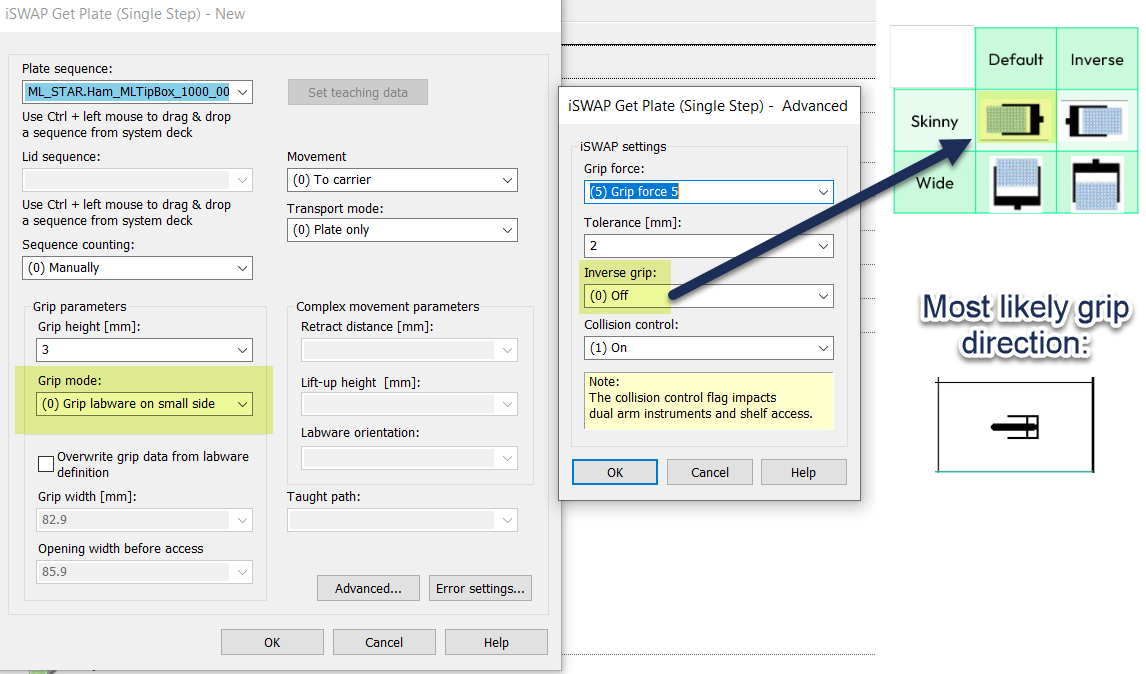
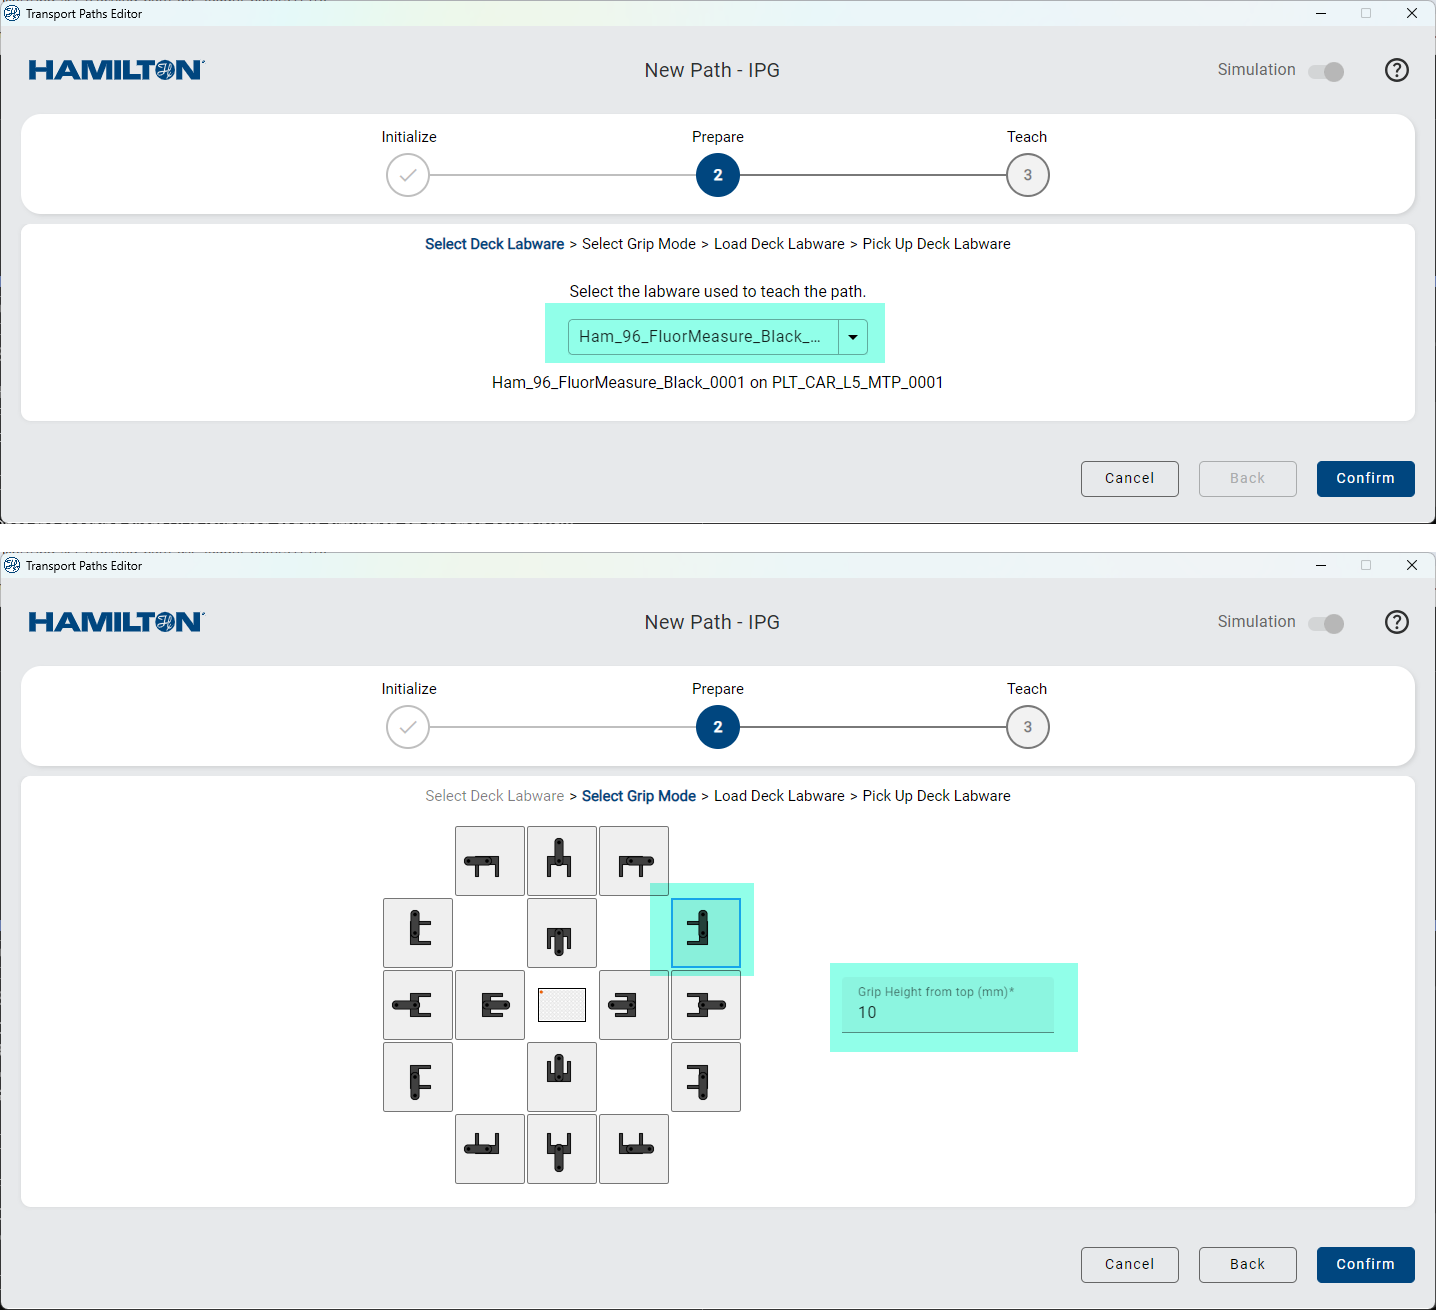
If you right clicked the labware you intend to use as the source plate for teaching, the corresponding labware Id will auto populate in the selection drop down. Select your source teaching labware, then the grip direction you want the plate to be accessed by and finally enter the grip height you want to use (relative to the top of the wells/container of the plate/labware in regards to the deck layout coordinates).

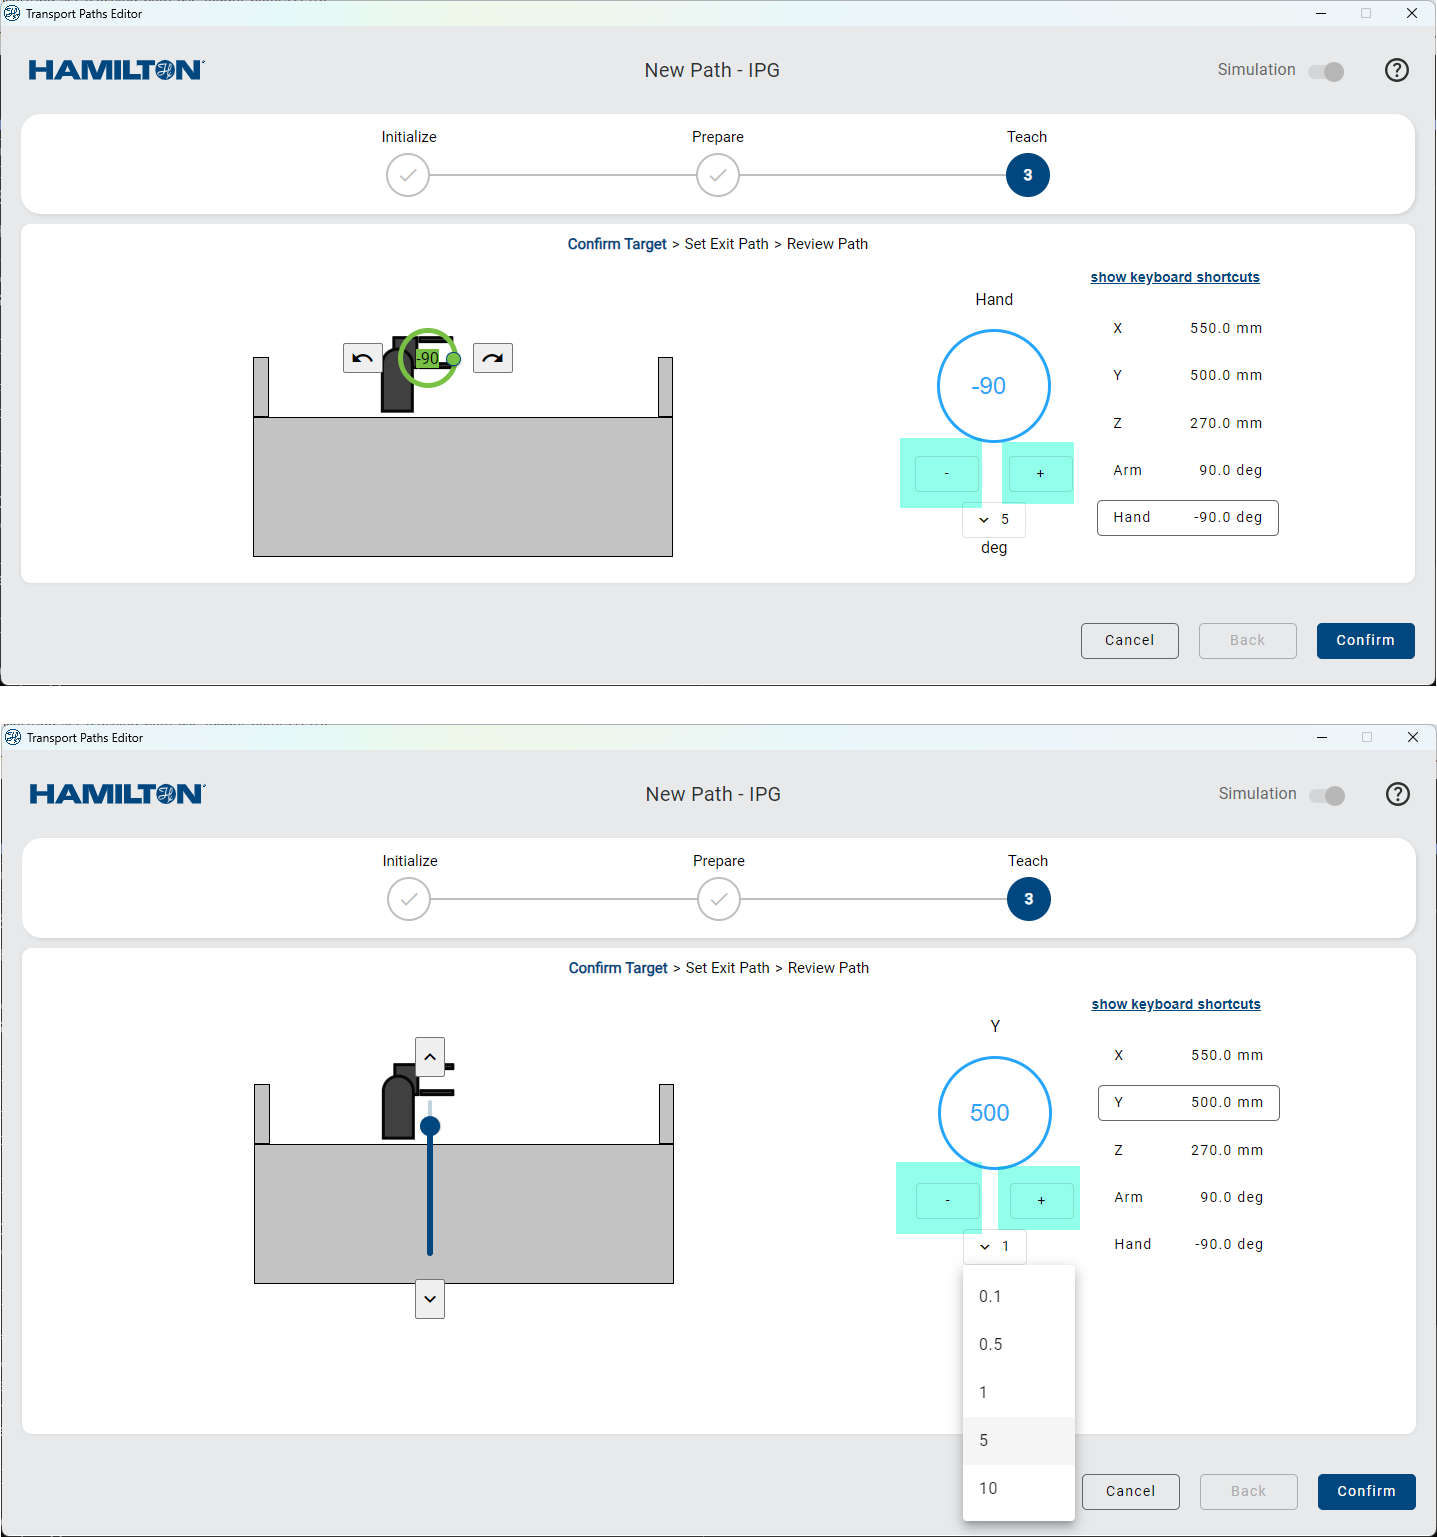
At that point just follow the remaining prompts to have the IPG load the labware and commence the teaching process. Select the axis you want to move, then the movement increment from the dropdown (mm for XYY, degrees for arm and hand). The ‘+’ and '- ’ buttons can be used to jog the axis relative to its current position by the selected increment. + being positive direction and - being negative direction. For arm and wrist, + is counterclockwise and - is clockwise.

For X, Y and Z you can also use the slider for large movements but please exercise caution and judgement for suck movements.

Keep jogging axes until you get your plate in its desired position/handoff. It does not matter how you get there or how many movements, the UI does not track these for path definition purposes. Once the plate is in its desired handoff, select ‘Confirm’.

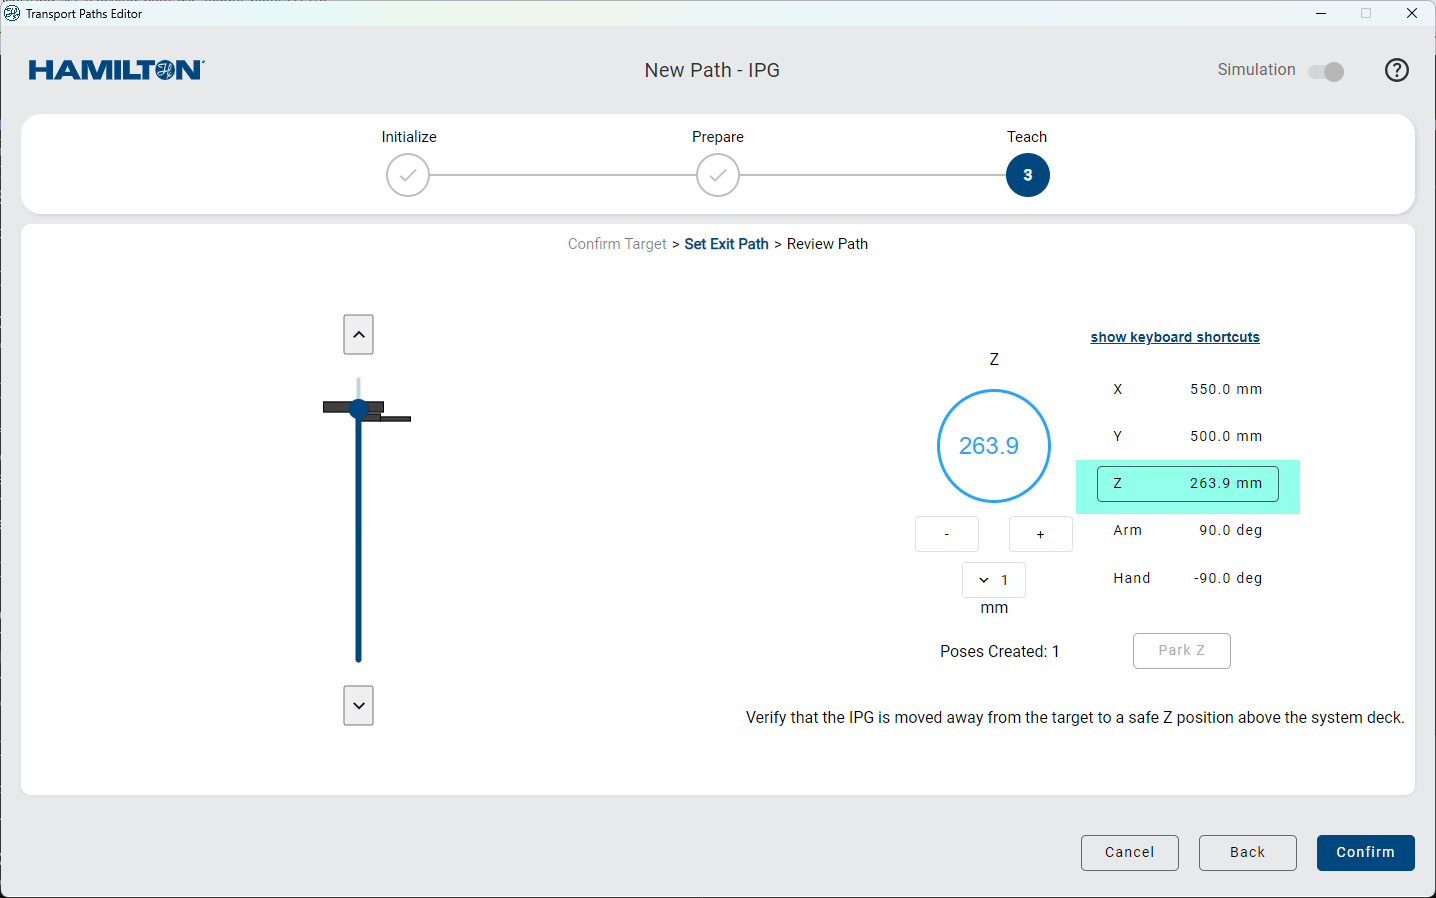
Once you are at this step, this is when path definition actually begins. Select the axis you want to move at this part of the exit path, then jog each movement methodically per how you want the IPG to access and depart from this location (you are teaching the departure sequence, approach will be done in reverse of the path poses).

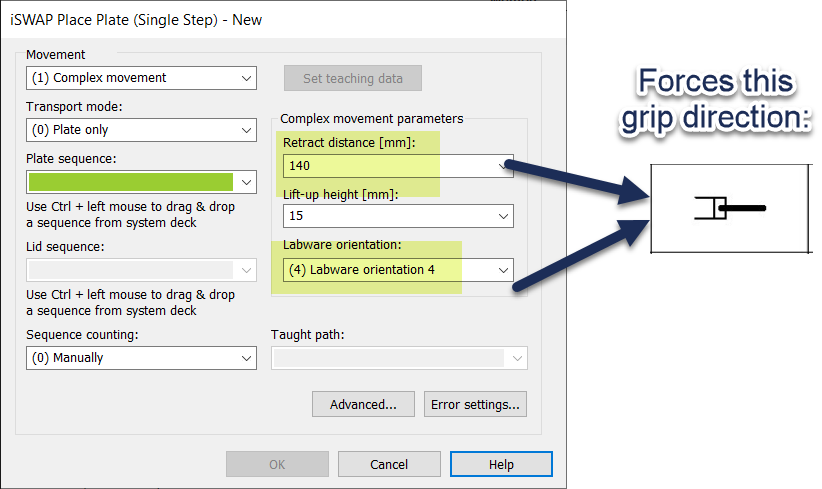
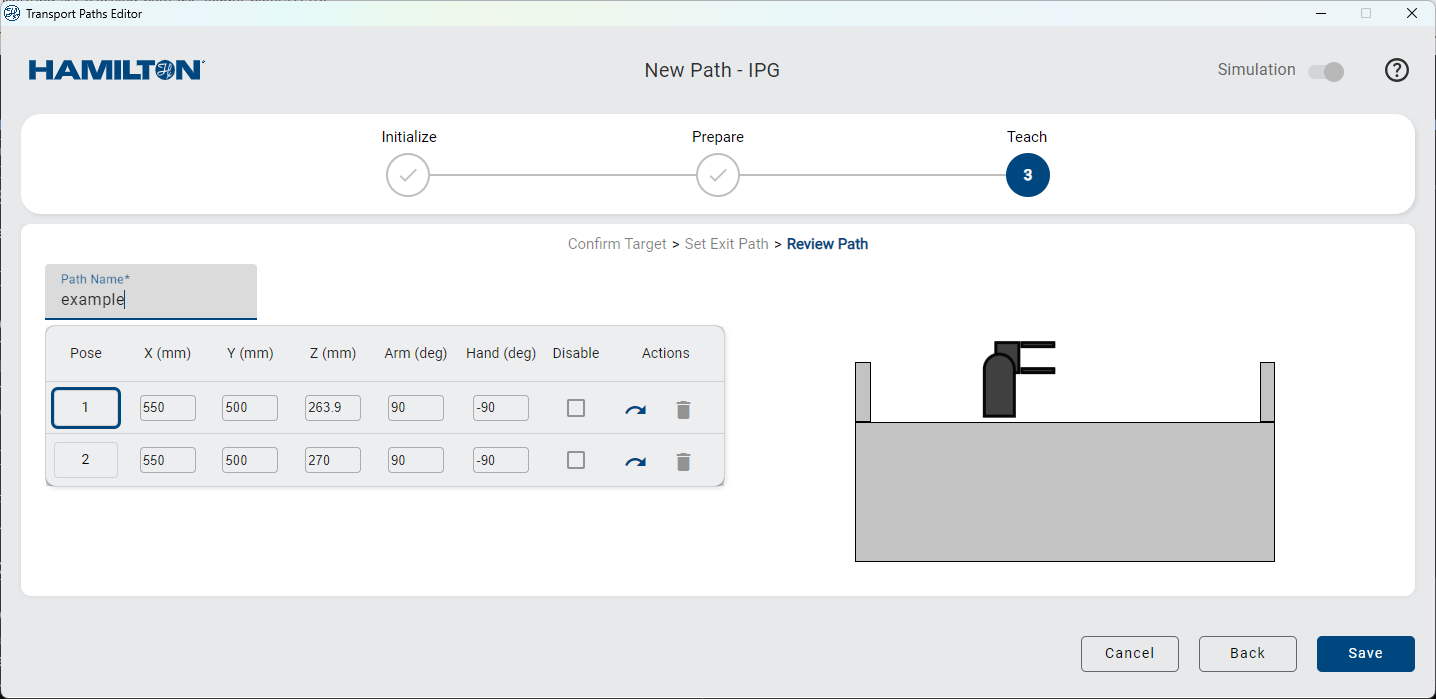
Many axis menus will have the option to park to its home. These are convenient when applicable. Path teaching will be complete once IPG Z is at traverse/home. No other axes will be required to be home or even orthogonal. At this point the UI will display the path poses which can be tweaked/edited manually if necessary. Name and save your path and you can then call it using IPG ‘get plate’ and ‘place plate’ method editor steps when toggled to custom path mode (note the example below is just to show what the UI menu looks like at this point). Your path will likely have more than 2 poses (there is no practical upper limit I am aware of). Each jogging movement you define during the ‘Set Exit Path’ portion will define a pose of the path

I recommend playing around with the UI in simulation a bit to get comfortable.

Thanks and let me know if you have questions.

-Nick

1 Like

Also, even thought IPG has been added as a tool for the new fluid motion arm on STAR using X1 channels, the IPG custom path UI is currently only implemented for VANTAGE installations.

-Nick

Thank you Nick, did not know that it was a Vantage only feature. That explains why we could not find it haha.
Do you happen to know if this will be implemented on fluid motion arms in the future?

Is there a way on the STARline to make the IPG arm rotate less than 90 degrees at a time?