Hi everyone,
I have written and integrated capabilities to use Hamilton’s autoload to allow loading and unloading of carriers, and use the autoload’s barcode scanner to scan labware that is correctly positioned.
This forum thread is a (hopefully) accessible, detailed training documentation to make the PLR community aware of this useful feature, and adaptation of it easier for people interested in procedurally accessing these features with PLR.
(Some updated form of this is likely to be integrated into the docs at a later point)
Disclaimer: I am not a Hamilton employee and information might be missing or incorrect. If you notice anything missing please comment corrections underneath for the open-source PLR community to learn and grow. Naming has been chosen on Hamilton vocabulary when known and been chosen pragmatically if unknown.
Reminder: Usage of PLR is performed on your own responsibility and Hamilton currently does not support PLR nor PyHamilton.
The features shown her were “exposed” for PLR, i.e. they are not new inventions but are standard Hamilton features that have now been made available for execution using PLR as opposed to the classical way through VENUS.
Background information about autoload
Check robot configuration
The first thing to mention is that almost every high-end liquid handler (LH) is different to the next one because, ideally, they have been properly designed and configured to the estimated usage when they were ordered.
As a result, check whether your Hamilton STAR or STARlet system actually has an autoload. If it doesn’t, according to Hamilton, the autoload can not be retrofitted, and the content of this thread might not be interesting to you.
Online example of STARlet w/o autoload vs example of STARlet w/ autoload
What is an autoload?
The autoload is an automated carrier management system sitting inside, at the front of the LH. It allows you to automate the loading and unloading of your carriers from the autoload tray into/out of the deck.
The autoload consists of (roughly-speaking) two components fixed on a sled:
- The autoload “carrier handler”
- The autoload “scanner”
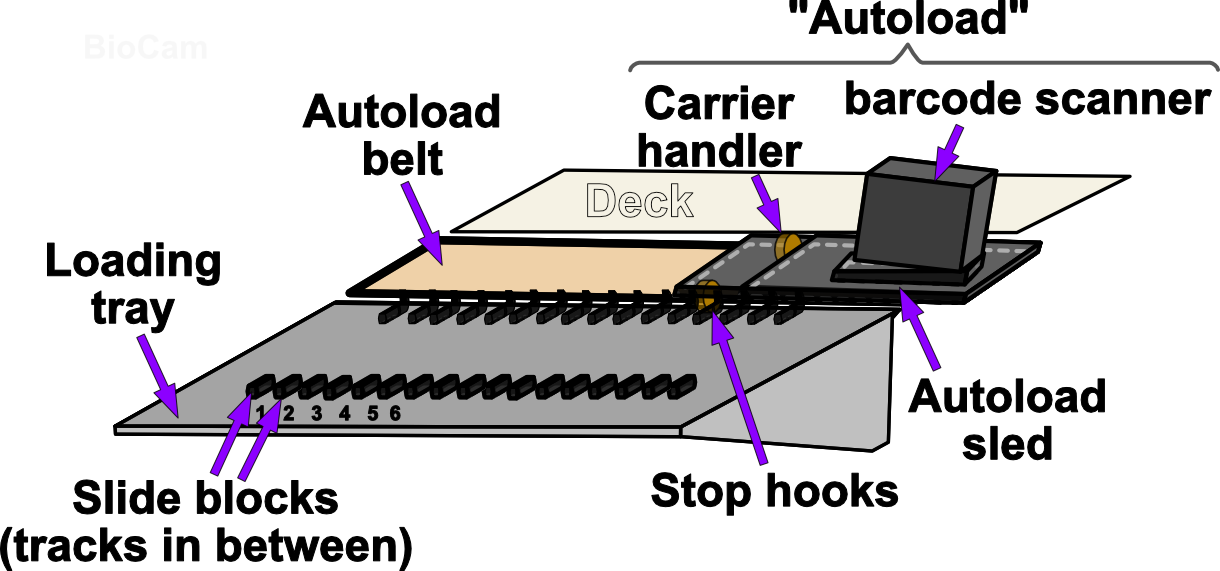
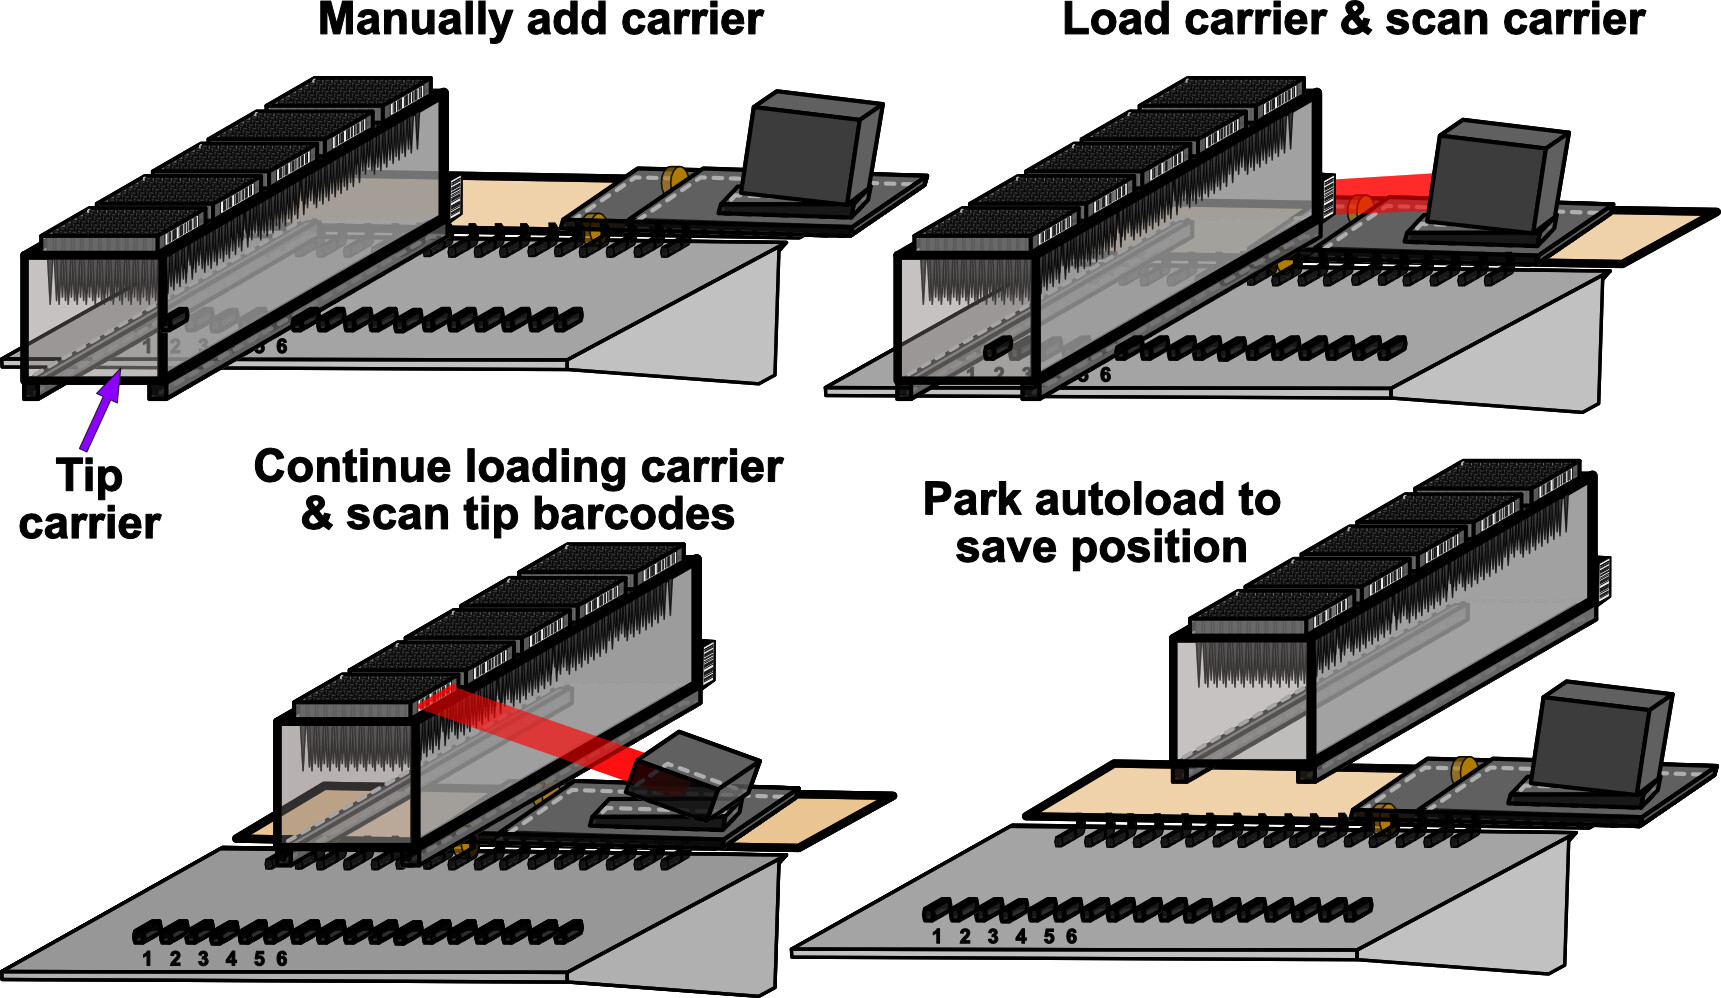
How to load carriers manually
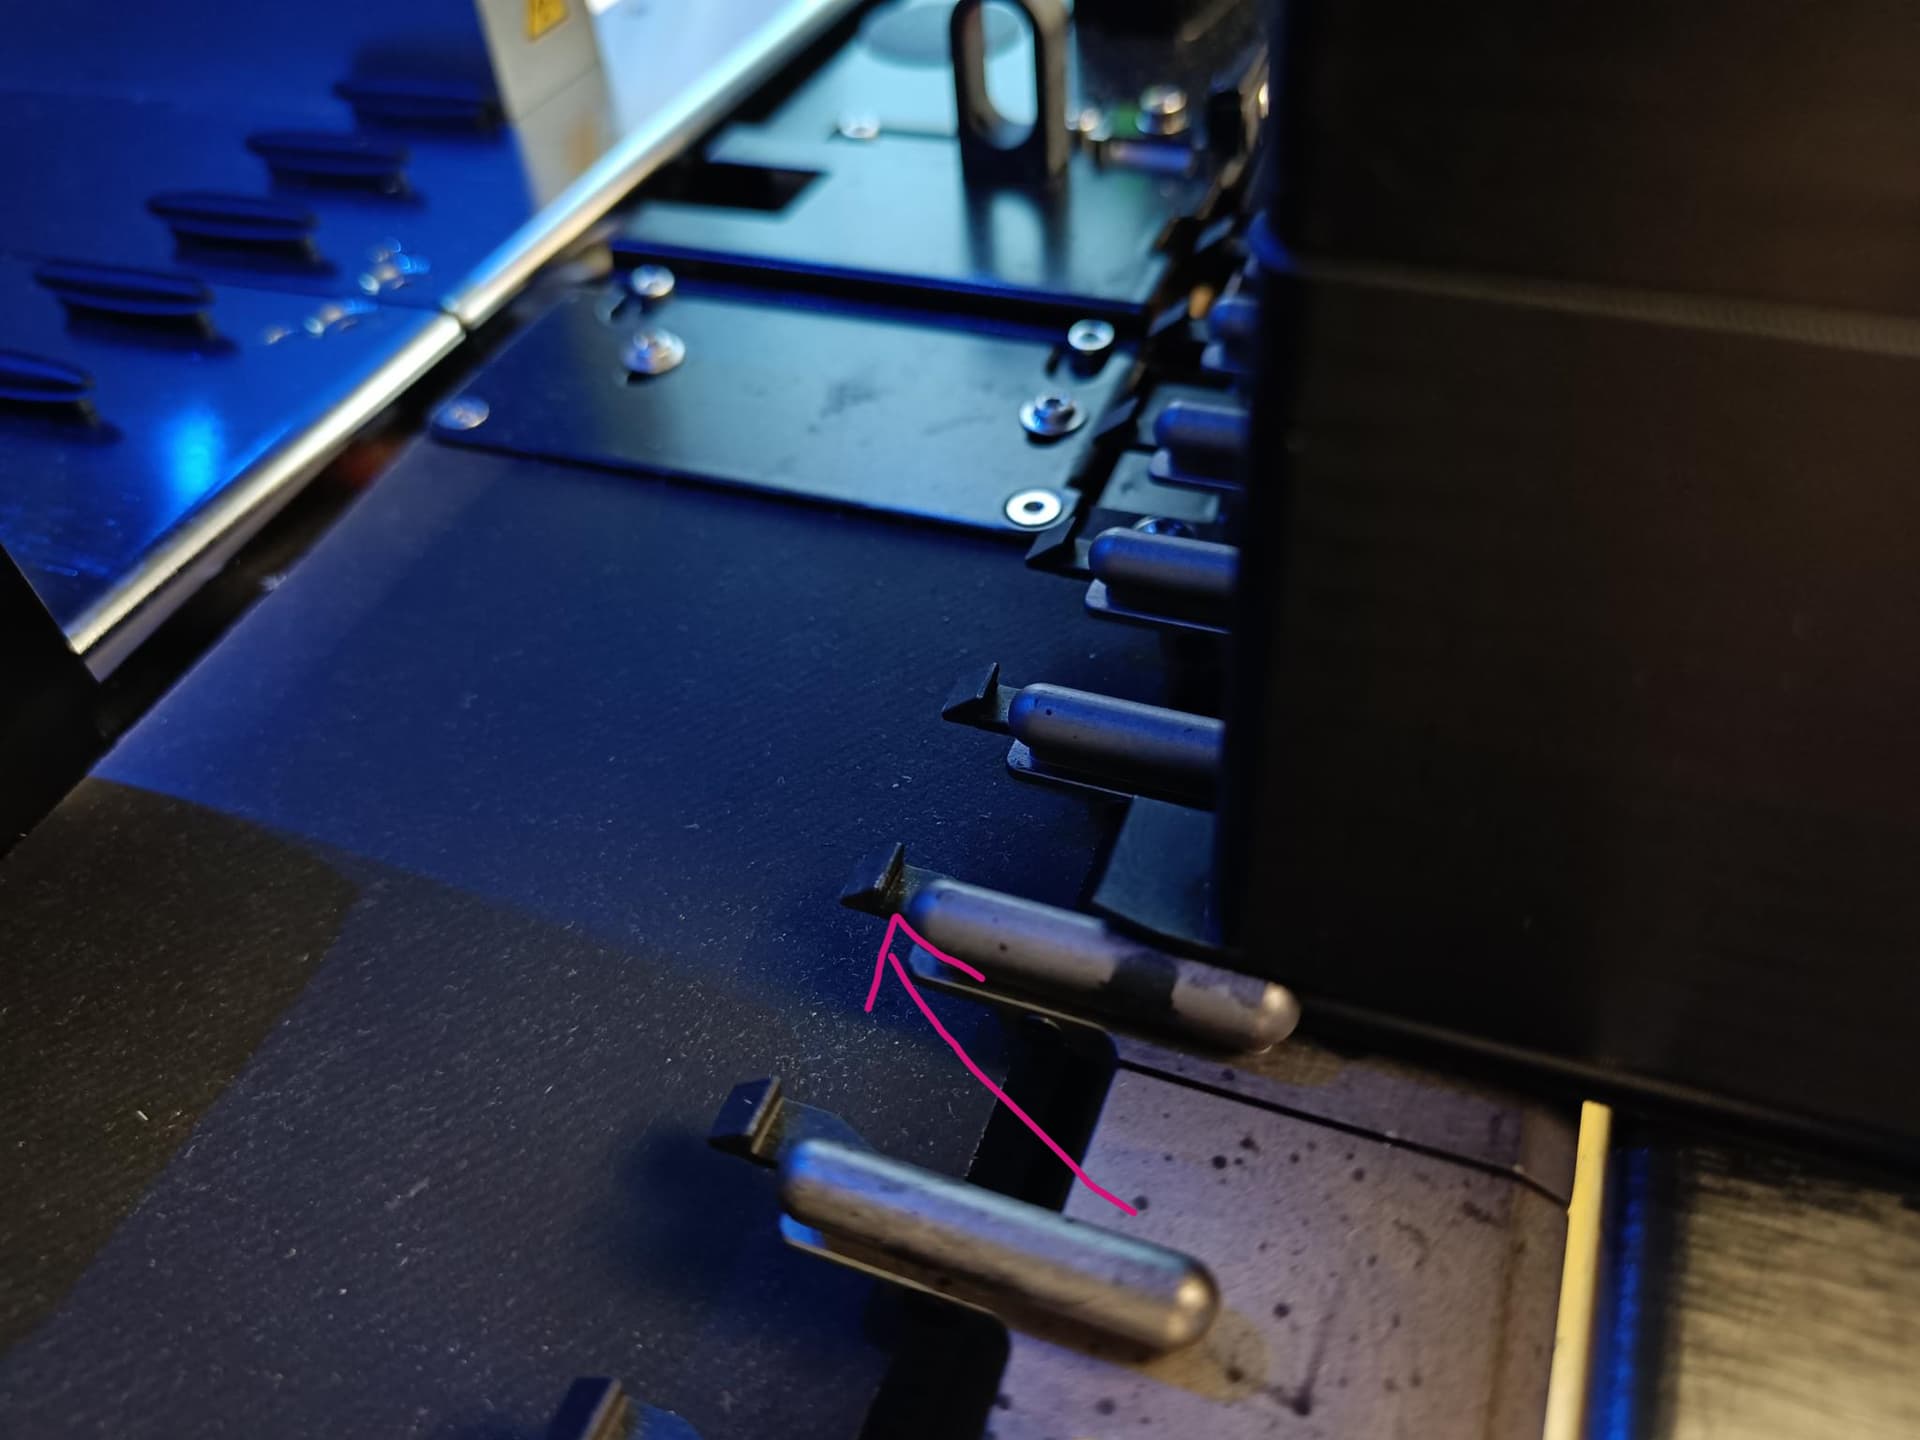
If your STAR(let) is equipped with an autoload it is usually also equipped with stop hooks. These prevent instant loading of a carrier onto the deck by stoping the right rail of a carrier.
To load a carrier manually you have to manually push the stop hook behind the right rail of the carrier you are loading down with one hand and push the carrier onto the deck with your other hand.
How to load carriers procedurally
As you can imagine, when you have many carriers this becomes a labour-intensive job: Imagine a Hamilton STAR with 54 track (T) positions; maybe 1x tip carrier (- 6T) leaves 48x 1T tube carrier positions that all have to be manually loaded by pushing down the stop hooks… not ideal.
The autoload offers the ability to load carriers instead of a human. It moves to the track position you tell it, searches for a carrier on the loading tray there and loads the carrier.
It does so by moving the “carrier handler” wheel underneath the right rail of the carrier, pushes the stop hook down and pulls the carrier into the machine using the handler.
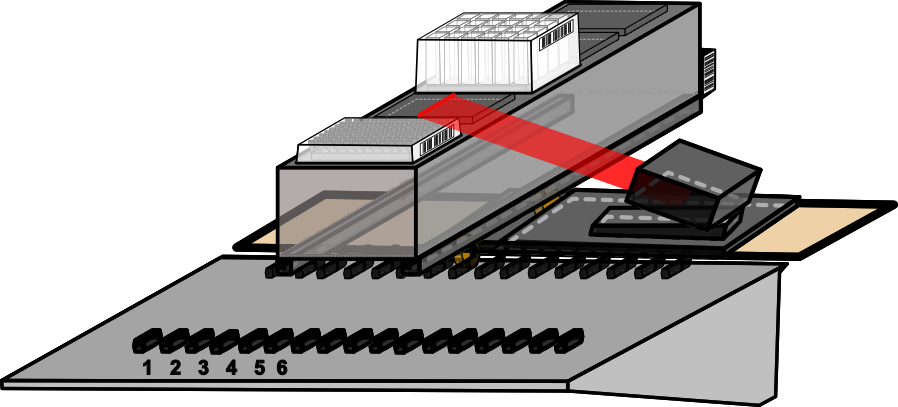
Barcode reading capabilities
When is the best time to check that your labware is correctly positioned? At the beginning of an automation run ![]()
The autoload cleverly also contains a barcode scanner that can rotate between a horizontal and vertical position, enabling reading of e.g. carrier, plate, tip and tube barcodes.
In VENUS this automatically checks that the correct carrier is in the right place.
Exposing autoload features in PLR
Pull requests #64 and #65 document the additional code added to expose autoload features.
Getting started
Here is a complete, minimal script that exemplifies how to use the new loading and unloading methods:
# Import libraries and set up basic deck
from pylabrobot.liquid_handling import LiquidHandler
from pylabrobot.resources.hamilton import STARLetDeck
from pylabrobot.liquid_handling.backends import STAR
from pylabrobot.resources import (
    TIP_CAR_480_A00, # TIP CARRIERS
    PLT_CAR_L5AC_A00, # PLATE CARRIERS
)

backend = STAR()
lh = LiquidHandler(backend=backend, deck=STARLetDeck())

# Initialise your machine - this now includes automatic identification of whether an autoload is installed and initialising it if true
await lh.setup()

# Generate carrier instances
tip_carrier_0 = TIP_CAR_480_A00(name='tip_carrier_0')
tip_carrier_0 = TIP_CAR_480_A00(name='tip_carrier_1')
# Assign carriers to deck
lh.deck.assign_child_resource(tip_carrier_0, rails=1)
lh.deck.assign_child_resource(tip_carrier_0, rails=6)

# NEW: simple loading of tip tip_carrier_0
await lh.backend.load_carrier(tip_carrier_0) # NB.: lh.backend = STAR in this case

# NEW: simple unloading of tip tip_carrier_0
await lh.backend.unload_carrier(tip_carrier_0)
–
Design of physical automation
The simplest way to automatically load all carriers in 1 line of code is…
[await lh.backend.load_carrier(x) for x in [tip_carrier_0, plt_carrier_1]]
…i.e. using a list comprehension to iterate the load_carrier method over a manually declared list of carrier instances.
However, what if you are an automation purist and don’t consider anything that requires manual declarations as “automation”.
Then you can use the lh.deck.resources.values() method to identify all resources currently on your deck automatically and load them if they are a carrier. A simple implementation is shown here:
[await lh.backend.load_carrier(r)
     for r in lh.deck.resources.values()
     if r.model is not None and "CAR" in r.model]
This concludes the basics of the autoload carrier loading and unloading capabilities.
–
1D Barcode reading - first steps to sample management automation
As mentioned above, the arguably best time to check that the correct labware has been placed in the correct position is a the beginning of your automation run, i.e. when the deck is being loaded.
To expose these capabilities, I added optional arguments to the STAR.load_carrier() method:
  async def load_carrier(
    self,
    carrier: Carrier,
    barcode_reading: bool = False,
    barcode_reading_direction: Literal["horizontal", "vertical"] = "horizontal",
    barcode_symbology:
      Literal[
        "ISBT Standard",
        "Code 128 (Subset B and C)",
        "Code 39",
        "Codebar",
        "Code 2of5 Interleaved",
        "UPC A/E",
        "YESN/EAN 8",
        "Code 93"
      ] = "Code 128 (Subset B and C)",
    no_container_per_carrier: int = 5,
    park_autoload_after: bool = True
  ):
- The first argument,
barcode_reading, activates barcode reading capabilities:-
barcode_reading_directioncan be changed depending on whether you intend to scan plates, tips or tubes. -
barcode_symbology: barcodes can be of different “types” or symbology. This might vary depending on the supplier/manufacturer you purchase from. Here are is an example I quickly generated for visualisation purposes:
-
park_autoload_after: when you load multiple carriers you don’t wan’t to lose time with the autoload sled homing to its park position after every loading execution but instead only want it to reach the park position after the final one.
-

The result of the barcode reading is directly stored as the return of the lh.backend.load_carrier() method, and can be parsed like any other Python string.
(There are a number of other optional arguments that will be added in the next iteration of the autoload exposure module of PLR.
We welcome somebody who has a liquid handler equipped with a 2D barcode scanner to update or work with us on an update for this type of scanner.)
Note: plate barcode reading
Plate barcoding can work the same way as the tip barcoding shown above. However, standard plate carriers are a lot shorter (z dimension) and the 1D scanner can only scan at a fixed z height (the tip barcode height).
As a result, microplates with a barcode cannot be directly scanned. (They can still be scanned by using CO-RE grippers or the iSWAP to move the plate in front of the scanner - future PLR work ![]() )
)
Deep-well plates, though, can still be scanned if the barcode is placed at the correct z height.
Happy automation ![]()