Does anyone have any experience on using ArUco markers for automated robot teaching, most lab automation integrators seems to be using them nowadays. There is obviously an initial (‘1 time only’) calibration process in addition to the hardware/labor of adding all the markers. Is this more hype than the value it actually provides? Looking to hear your thoughts ![]()
1 Like
Is really everyone using them? I only know of two labs using them and they have mobile robots. Everybody else simply teaches fixed positions which is fine since most devices are fixed to the platform and robotic arms are quite reliable on their positioning.
Although, I mostly know academic labs.
1 Like
There are a few (automata, the thermo ones had vision-based, but I don’t know what fiducials they used).
I’ve been playing with this as a side project. My hope was to make something for both mobile robots (to correct for the inaccuracy with the base) and for fixed systems (just put down teach-plates with arucos, then the system could see & compute the coordinates for each nest). With Claude and Gemini I was getting ok results - but I didn’t get far enough to see if I could get ~0.1mm accuracy. I have a test rig for running the checkerboard calibration and then detection / pose estimation. I can share if you’re interested. I’d love to work out a good set up for this.
2 Likes
I’m sorry, I should clarify. Most integrators are selling this feature as part of their package, I also haven’t heard of many people actually using them ![]() . I agree with you, proper hardware fasteners solves the issue this is trying to solve.
. I agree with you, proper hardware fasteners solves the issue this is trying to solve.
@RKeyser I would be really interested in seeing your approach ![]() . I also like the idea of placing the arucos on the teachplate. 0.1mm isn’t too bad, did you look into using AprilTags ? Might be better for higher accuracy but slower to process.
. I also like the idea of placing the arucos on the teachplate. 0.1mm isn’t too bad, did you look into using AprilTags ? Might be better for higher accuracy but slower to process.
1 Like
The teaching plate approach sounds cool. I honestly never considered adding that. It is currently no option for the robotic platforms in my department but I am still curious about your results.
Send me your github name and I’ll share a repo with you. Happy to jump on a call to walk through it too. I am using an xArm6 and some basler cameras.
I haven’t tried the AprilTags, that’s a good idea. There was still a lot of room to explore w/ multi-camera and settings, and I never considered the marker itself.
2 Likes
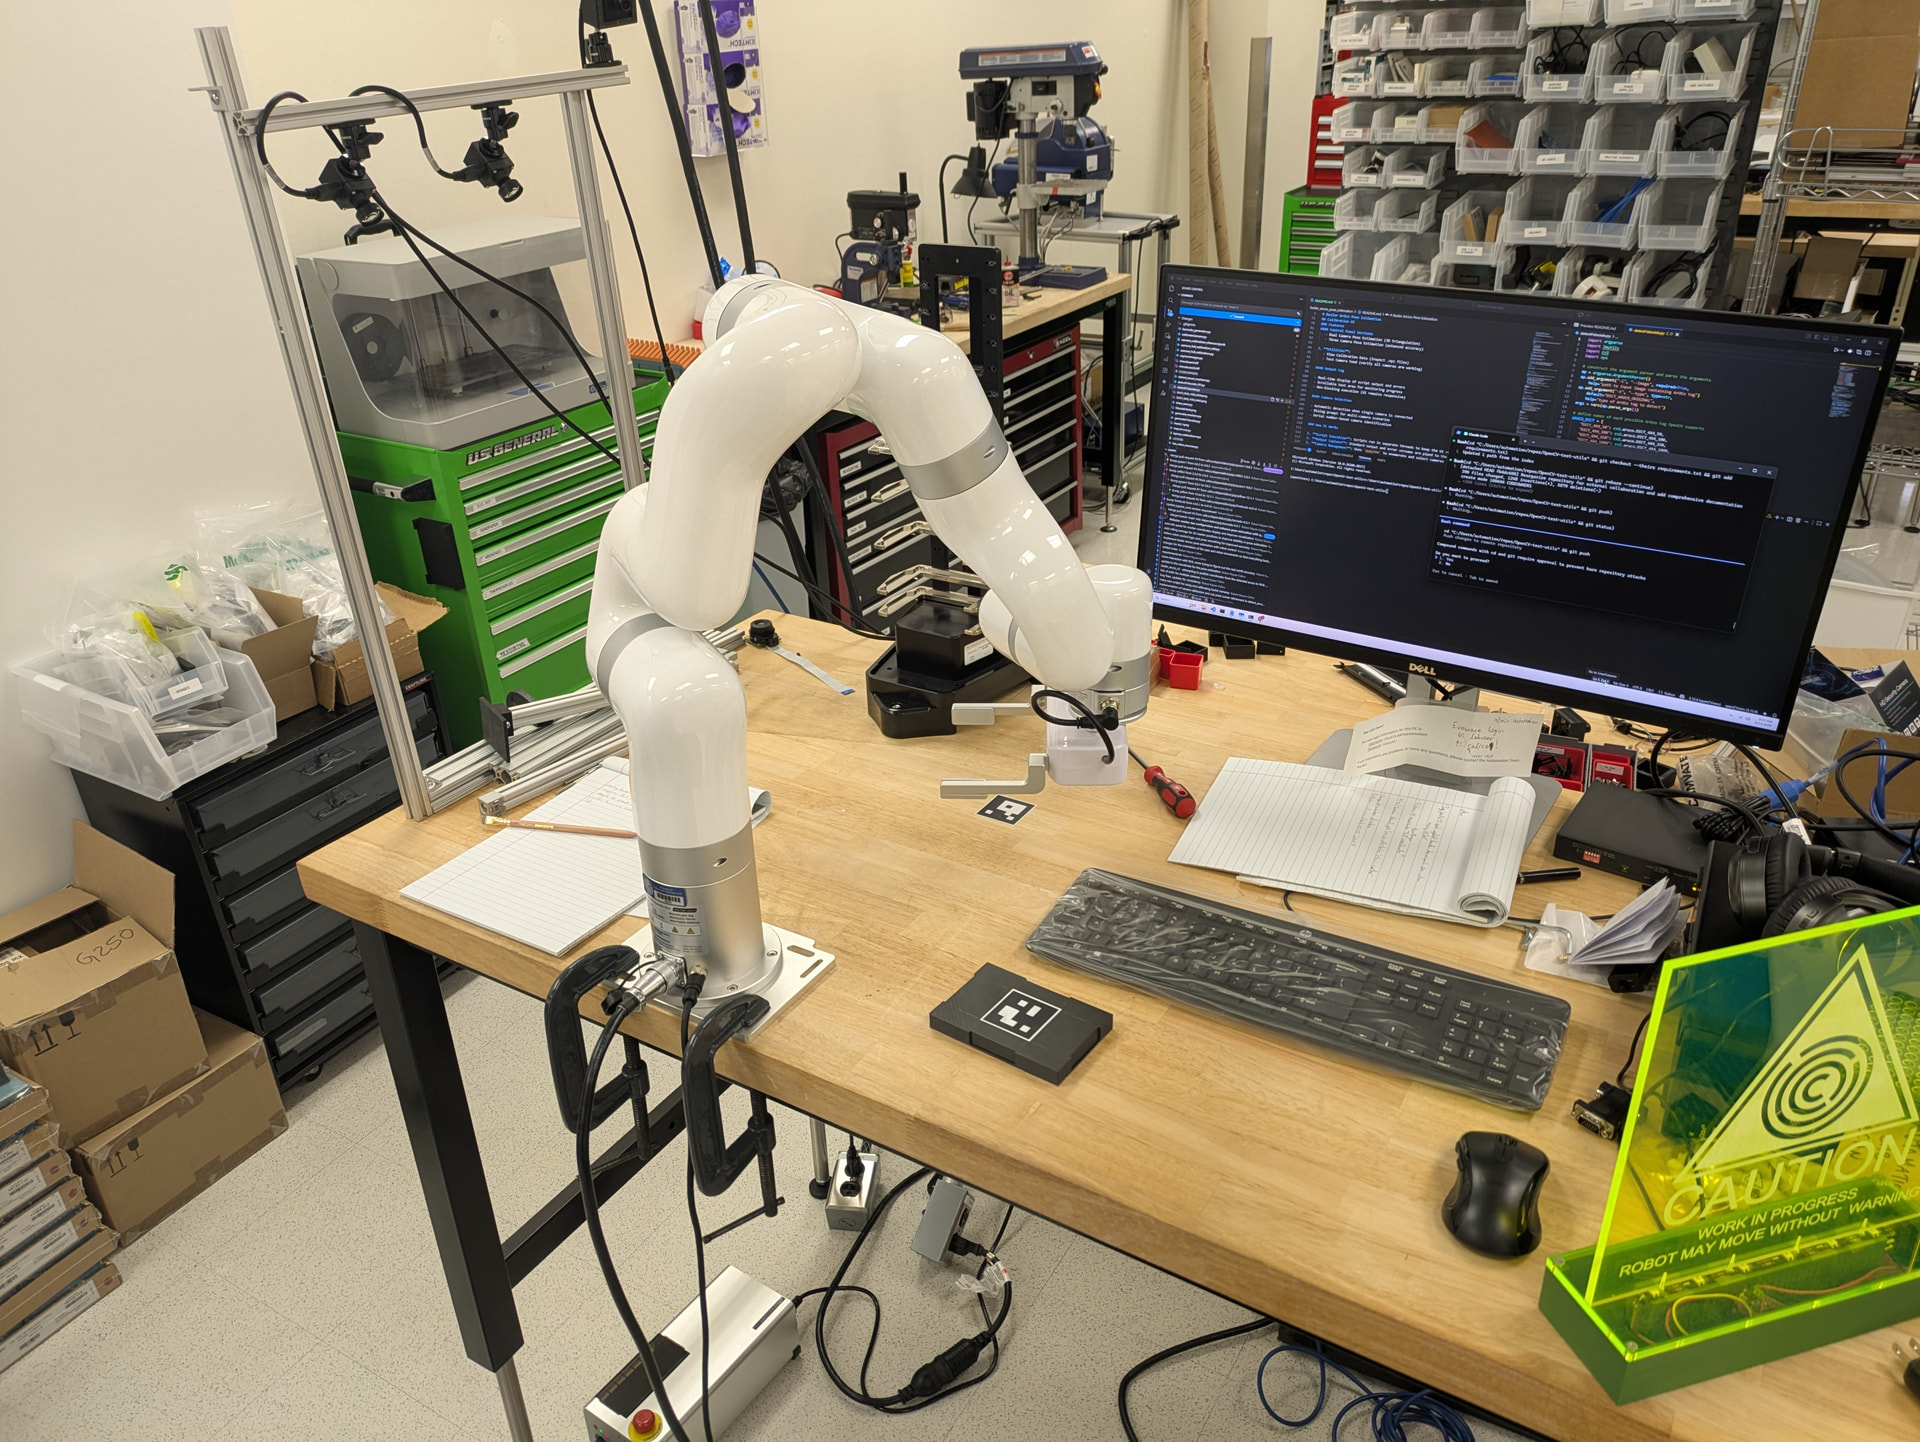
Great setup! Sent you a message, thanks for sharing. Curious on how do you like this robot arm?
The xArm has been great. I ran a big set of tests for repeatability w/ a 2.5lb weight and it was really good. Maybe in a factory running 24/7 it wouldn’t cut it, but for moving plates it seems just fine.
# xArm 6 Evaluation Report
## Background
The xArm 6 is a 6-axis collaborative robotic arm (cobot) created by uFactory. There are a couple of other variants available: 5 and 7-axis, a lighter 6 axis, and an extended reach version. The xArm 6 seems like a good middle ground for “general” lifescience lab use, and without any more concrete reasons than that, I picked it to evaluate. It has a 700mm reach, a payload capacity of 5kg, and an advertised repeatability of ±0.1mm.
A key selling point of the xArm 6 is its cost-effectiveness. The xArm 6 at the time of writing (10/2025) is listed on their website for $8,900. There are a few gripper options available for ~$2,000. Comparable, standard life-science automation arms (Precise Flex PF400, or the Universal Robots UR3) are 4x - 5x the cost of the xArm 6. I am sure that there is value from that added cost for some users, but for low-speed, low-cycle, low-payload, mid-accuracy applications typical in life science laboratories - the xArm 6 may have sufficient performance to be a viable cost-effective option.
uFactory is quite open with software examples and CAD files. They have few, but usefull looking, accessories: parallel face grippers, “bio-grippers” - ie for microplates, force sensor, camera mount for RGB-D.
uFactory does not have demos, but they let us “rent” the arm for a 30 day evaluation. The rental fee was 25% of the purchase price, which would be applide to the purchase of an arm if we decided to buy one.
## Hardware
The arm is what it looks like. Setup was quite easy - I used the provided 6x M6 screws into a mounting plate and a couple of C-clamps to hold it in place on the table. It is quite light - 12kg, so I was able to unbox it and mount it on the table top myself.
## Software
- **UFactory Studio:** [Link to UFactory Studio](https://www.ufactory.cc/pages/xarm-studio-download)
- The studio software provides a UI for jogging the arm and setting operating parameters.  It also provides an easy interface for Blocky, python, and g-code programming.

- It was actually quite easy to navigate and use.  There was a tool for determining the center of mass for a payload, the manual control (ie float mode for manually moving the arm into position) was useful.

- It is pretty basic though, so some nice-to-have features are missing (capture coordinates, simple cycling)
- **Python API:** [Link to Python API Documentation]( GitHub - xArm-Developer/xArm-Python-SDK: Python SDK for UFACTORY robots, 850, xArm5/6/7, and Lite6. · GitHub )
- Lots of examples, looks pretty complete.  But I really only tried out the move to point functions, so I'd love to hear from other, more robot savy, folks about how complete and useful the API is.

- I used this for my testing and it worked well.  The only odd thing I noticed was that when there was an error (like me physically blocking the arm to test the force feedback), the arm would stop but the API calls would continue to return.  I could have checked the return messages, but it seemed a little odd that there wasn't some kind of exception thrown.
- **ROS2 Package:** [Link to ROS2 Package]( GitHub - xArm-Developer/xarm_ros2: ROS2 developer packages for robotic products from UFACTORY · GitHub )
- I'm not a deep ROS user either, but it's nice that there's a complete ROS2 package. I got the URDF loaded and did some simulation with MoveIt. They've got a lot of examples for simulation and real arms.
## Testing Results
I did a bunch of tests, but this one is somewhat of a super-set of all of them. The setup was this:
- Robot arm mounted to the table w/ mounting plate & c-clamps
- Deflection gauge mounted to the table with some squeeze clamps - McMaster-Carr
- Data cable McMaster-Carr (I don’t suggest this gauge or cable setup, there must be a better way to read data off of one of these. If I was going to do it again, I’d either find one that works out-of-the box, or use a camera & ORC)
- Used a phidgets hub and relay to trigger the deflection gauge
- The robot was holding a 1.13kg barbell weight in the parallel face grippers
### Deflection Test
**Setup:**
The deflection test was performed to measure the robot arm’s displacement with a 1.1kg payload. The robot was moved between two points, and measurements were taken at each point. The data was recorded in a CSV file (`deflection_data.txt`) with two columns of interest: `Data1` (measurements at the starting point) and `Data2` (measurements at the ending point, 20mm away). I did my best to align the 2nd point 20mm away along the X-axis. In between each cycle the arm was moved to a point ~300mm away.
**Results:**
The analysis of the deflection data shows a consistent and measurable deflection. The key findings from the analysis are as follows:
```
Statistics for Data1:
Average: -2.5094
Standard Deviation: 0.0106
3 x Standard Deviation: 0.0318
------------------------------
Statistics for Data2:
Average: -22.5814
Standard Deviation: 0.0116
3 x Standard Deviation: 0.0349
------------------------------
Statistics for Data2 - Data1:
Average: -20.0720
Standard Deviation: 0.0080
3 x Standard Deviation: 0.0240
------------------------------
```
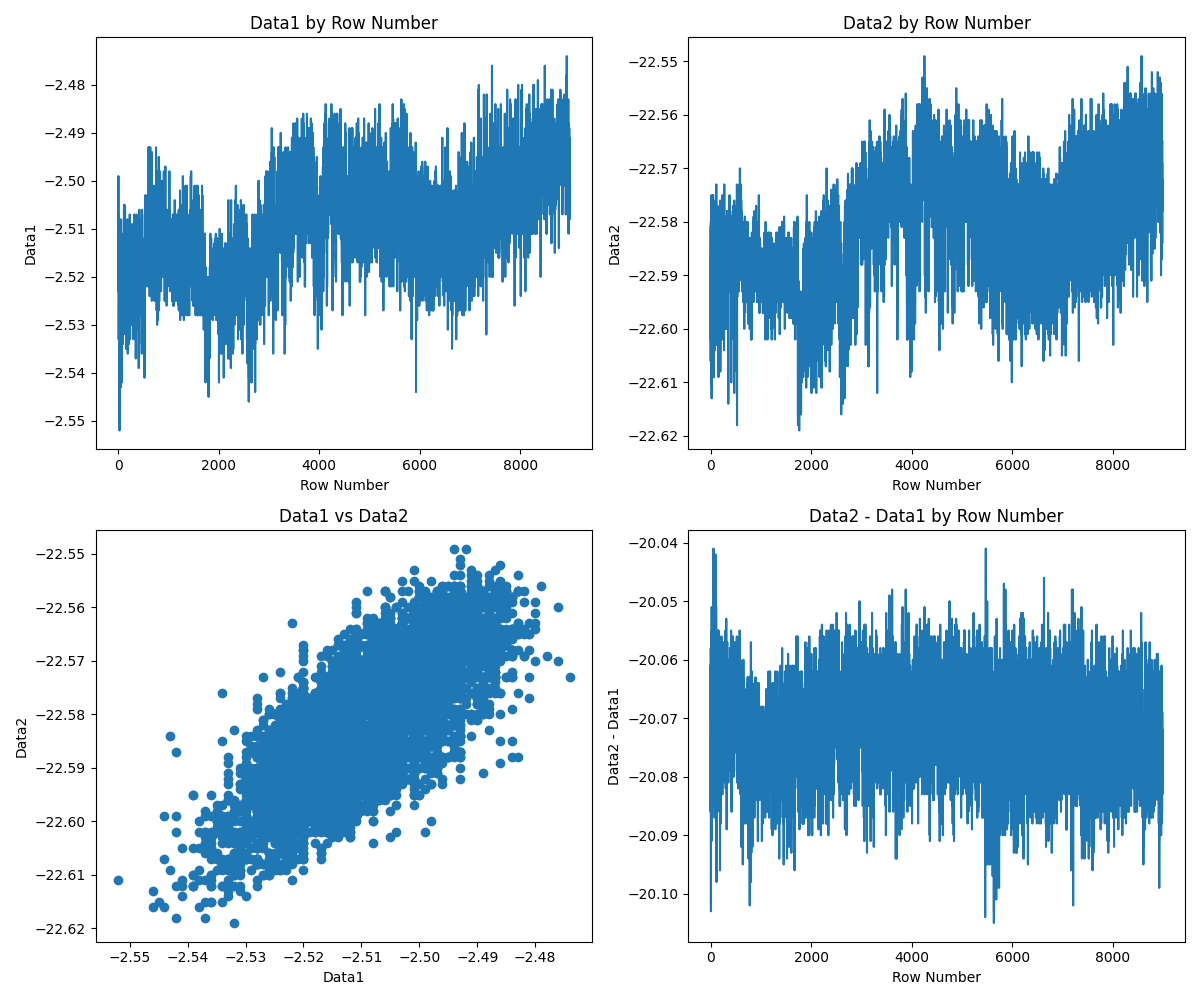
* **Average Deflection:** The average difference between the start and end points was approximately **-20.07mm**. This indicates that the robot arm deflected by about 0.07mm over a 20mm movement. And, given the positioning errors in aligning the gauge along the robot’s X-axis, it’s pretty good.
* **Standard Deviation:** The standard deviation of the difference was very low (approximately **0.008mm**), indicating that the deflection was consistent and repeatable.

*(Note: The plot `deflection_analysis_plots.png` is available in the `aggregated_results` directory.)*
**Discussion:**
Overall it looks very good. The 3x standard deviation of <0.1mm should be repeatable enough for microplate pick and place tasks.
The large-scale trends in the Data1 x Row and Data2 x Row graphs is probably due to the building or the arm cooling and heating (the ~9,000 cycles took 1.5 days to run). And given how things are clamped down, some drift is probably due to the physical setup.
There are no outliers in the data or random errors during the long-cycle testing. An occasional, random, significantly off position would be a deal-breaker.
The Data1 vs Data2 and the alignment of the drift in the two upper graphs show that the most of the deflection difference is from macro-scale factors. IE when the robot is short getting to Postition 1, it will also be a little short getting to Position 2.
I also ran a continuous motion test over 4 days: no issues.
Also ran a few smaller-cycle number deflection tests with no weight, and with higher speed: no issues and the differences were negligible from this larger test. The only issue I did run into was running at max speed with the weight, that would cause some errors with the joints reading forces over their limits.
## Conclusion
1. This arm seems more than good enough for a microplate pick and place system. For a stacker function or small integration, this arm would be easy to setup, easy to program, more than capable positioning-wise, and very cost-effective.
Caveats:
- I am not robot-savy enough to know if the lack of figures is a killer for dynamic motions or more complex sets of motions.
- This was a demo unit, tested over ~2weeks
3 Likes
Thank you for all the details, appreciate it. Sounds very promising and the entry cost is VERY attractive. It’s good to know there are other affordable options ![]()
there is a thread about xarm vs. pf, vs. ur: Robotic Arms: xArm6, UR5e or PF400? - user experience & feedback from laboratories
1 Like
nice, will take a look! ![]()