Labware Definitions: container cross-section & carrier type (PLR)

Hi everyone,

I have two questions regarding PLR labware definitons:

1.) Container cross-section (square, round)
How can different container (x-y) cross-sections currently be defined, e.g. square vs round?
I have looked through the container.py and well.py files but couldn’t find an easy way to assign the specific geometries.

However, I found that…

  • when using the Container() class it automatically appears as a square, and
  • when using the Well() class it automatically appears as a circle
    in the PyLabRobot Simulator:

image

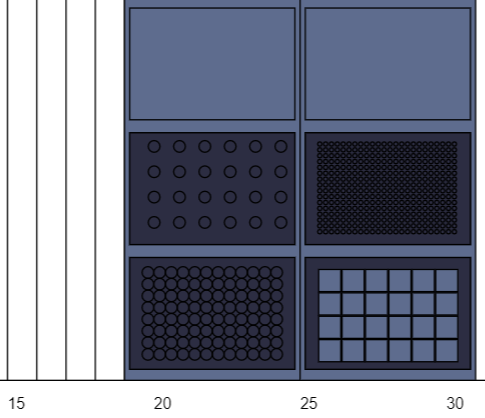
Is a “Well” automatically defined as circular in cross-section in PLR, and a “Container” as square?

2.) Carrier/template type (container, rack)
I could not find any information whether PLR-carrier definitions allow distinctions between container-based and rack-based carriers, and whether PLR already has the necessary automated z height calculations to safely switch between the two.

1 Like

Yes. This should probably be refactored to allow Well to be both square and circular. (Container is a general subclass for any liquid container, subclasses also includes troughs.)

We do not make an explicit distinction. You can adjust the location of each plate relative to the carrier site by setting its z position, using which you should be able to represent the model above (though with less detail). I think these should be included in Carrier instances in PLR parsed from VENUS, but please double check.

Thank you; this makes a lot of sense to me. I am happy with “Well” being specifically referring to a round cavity that can hold liquid, and container being a general term for all cavities that can hold liquid.

Can you please elaborate on how to adjust the z position? Is a plate z position not directly calculated from the carrier size_z + plate size_z for the top of the plate, and carrier size_z + plate dz for the bottom of a well/container?

In this case, defining carriers as container- or rack-based would require
1.) no adjustment for rack-based carriers, and
2.) adjusting container-based carriers’ positions:

  • if carrier_skirt_z > plate dz:
    • plate top = carrier size_z + (plate size_z - plate dz) + carrier_skirt_z
    • well/container bottom = carrier size_z + carrier_skirt_z
  • if carrier_skirt_z <= plate dz:
    • no change

Please let me know whether this makes sense, and sounds corrrect.

I could image wrapping this up into a function that can be quickly added to all carriers, rather than appending specifics to each carrier.

That is how it is calculated. The plate dz would be the z position of the well. We do not have a way of representing the plate skirt/edge specifically, but it would be close to the z position of the well, minus the height of the bottom of the well I imagine. If needed, I can try to add these from the VENUS definitions.

Note that plate.location.z refers to the bottom front right corner, not the top of the plate. Adding plate size_z is the top.

Sounds correct. Keep in mind that plate dz as used here does not exist. well.location.z seems the best substitute.

This assumes no height for the bottom of the well, right?

Yes, this could serve as a replacement for location=Coordinate.zero() in carrier.py (line 128).

Thank you for all your fast answers, @rickwierenga

Yes, I think that would be very useful because the difference can be quite large and potentially dangerous for the machine and samples: Most rack/labware definitions are made by hand. For many plates dz is only 1-2 mm but the skirt of a carrier site is usually around 5-6 mm. If the carrier height is defined to the bottom of the skirt than our pipettes will crash through 4-5 mm of steel. A quick fix is to define dz to the height of the skirt but that is not dynmic and could give problems with plate gripping down the line.

For explanation purposes I have made this infographic, which next to the associated labware definition code I found very useful for making high-precision definitions (could you please check that this is PLR-correct?):

#: Cos_96_Vb
def Cos_96_Vb(name: str, with_lid: bool = False) -> Plate:
  return Plate(
    name=name,
    size_x=127.0,
    size_y=86.0,
    size_z=14.24,
    with_lid=with_lid,
    model="Cos_96_Vb",
    lid_height=10,
    items=create_equally_spaced(Well,
      num_items_x=12,
      num_items_y=8,
      dx=9.5,
      dy=7.0,
      dz=1.0,
      item_dx=9.0,
      item_dy=9.0,
      size_x=9.0,
      size_y=9.0,
      size_z=10.9,
      bottom_type=WellBottomType.UNKNOWN,
      compute_volume_from_height=_compute_volume_from_height_Cos_96_Vb,
    ),
  )

Yes, you are right. The thickness of the well/container must be added to this calculation.

That’s amazing, and makes integration of carrier site skirts very simple! I can imagine this also being very useful for the plate stacks I am looking into because most lids have their own version of a skirt on their top.

2 Likes

I’ll do that right after I look into the trace file! (I’m in a super busy period, so it might take a little bit)

This graphic is awesome! With your permission, I’d love to put it on the docs website, linking to your post.

2 Likes

I agree that is a great drawing

1 Like

Please don’t apologise, I know you will be quite busy for the next couple of months, and really appreciate the collaboration and help on this.

Yes, of course. I kinda also made it to encourage other people to add new labware to the “PLR Resource Library” (is this what we should call the compendium of all resources usable via PLR?).
So adding it to the docs website would be fantastic. I’m also happy to write some documentation on how to add new definitions, and then add them to PLR:main (either send pull requests through GitHub or post the definitions here so a PLR contributor can add them [I’m always trying to remember myself that most people wanting to use this might not know how to use Git :sweat_smile:]).

PLRRL! Love it!

That’d be awesome.

I already wrote a basic tutorial on custom resources, but feel free to expand it: https://docs.pylabrobot.org/custom-resources.html. An introduction on how resources work on a high level would be really good, and definitely include your diagram. It’s just a markdown document: https://github.com/PyLabRobot/pylabrobot/blob/main/docs/custom-resources.md.

Adding this through git/PR is preferred, so they can be display on the website in an organized way. The forum is less efficient as a reference (I see the forum as a cloud that settles in the docs).

That’s why I have a little guide on the website for people new to git: How to Open Source — PyLabRobot documentation :wink:

People reading the guides / using PLR don’t necessarily have to know git.

discussion continues in PLR Carrier z-Height Issue - #3 by CamilloMoschner

1 Like

Link update after forum renaming:

1 Like