Tip Scanning with Autoloader

Hi All,

I see that there is a way to adjust the Z for the 2D scanner, but is there a way to adjust it for the 1D scanner? I’m using Cos_96_HalfArea plates on a PLT_CAR_L5AC_A00, which I know is for deep well plates (technically its a APE carrier but someone told me to use the L5AC definition) so the scanner is way higher than I need it to be.

Thanks!

Kaitlyn

Hi @InnerKK ,

Unfortunately the 1D Autoload can only adjust for horizontal or vertical scanning. When horizontal the height is fixed. Only plates in PCR or MTP carrier heights can be scanned.

The 2D Autoload is a camera instead of a scanner which allows the software to specify the target 2D space to scan.

Technically (literally) your field service engineer can change the z height of the 1D scanner, but then it may be the wrong height for scanning everything else.

Hi @BrandonBare_Hamilton
In this case, with 1D Autoload, is it possible for a scanner in a vertical position to read horizontal barcodes on any carriers?

Hi @Oleksandr ,

It cannot. The scan is purely 1 dimensional. If the Autoload is in the vertical position, then it will only scan 1D barcodes that are vertical.

Thanks for the reply Brandon. Just to make sure I’m understanding correctly, if people have custom carriers, they would need to have the 2D autoloader in order to scan barcodes?

Do you know if changing the Z height for the horizontal configuration would change anything about the vertical configuration?

Hi @InnerKK ,

Correct. You can see the line with the 1D Autoload that it is attempting to read the barcode when it scans. If the 1D barcode does not line up with the red line coming from the Autoload, then it will not scan.

The 2D autoload can read in 2 dimensions which allows for the Z parameter to come into play. This is what allows deeper carriers to also be able to be scanned.

Your best option to scan barcodes of plates on a deep well position with the 1D Autoload would be to use the present and scan option either with Core grips or the iSWAP.

1 Like

Ok sounds good, thanks for the explanation!

Hi Matthew,

Thank you for comprehensive explanation.

I would like to scan a skyframe’s carrier stacked tipracks top and bottom (i.e. total of 10 tipracks) such as the one shown in the DemoTipManagementLibrary method “MFX_CAR_5_SF_300_STF_V1_1_0001“.

Do you have “Labware Specific Properties” suggestions that could accommodate the above?

Thank you!

3 Likes

We are considering implementing Skyframes as well so would also like to know. Would be interesting to see what approach Hamilton recommends to scan both level of tips.

2 Likes

Hi @MSMDG and @WictorGummesson,

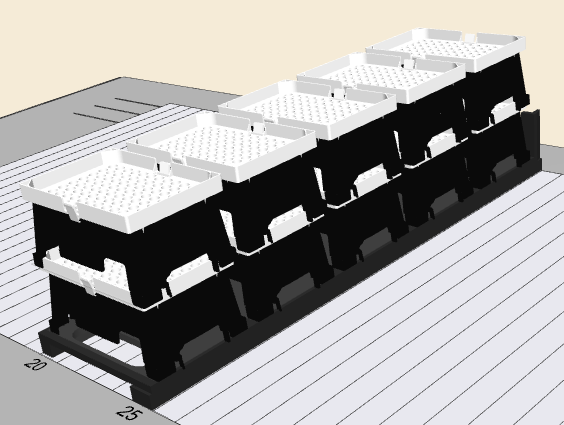
Unfortunately the SkyFrames are not supported in the United States, but thankfully I do have some on hand to test with. We can use it as an example for similar labware situations where labware are stacked like Hamilton Tip Boxes. So let’s consider what the carrier’s default definition looks like first: it’s a standard MFX carrier with 5 sites and on each of those sites is a SkyFrame rack snapped to it as a stack of 2.

There is one very simple approach which would be to load and scan the carrier twice with labware properties added to just the carrier based on my first post:

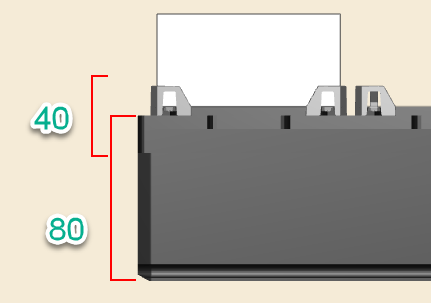
  • MlStar2DReaderRoiYCenterOffset = 0
  • MlStar2DReaderRoiZCenterOffset = 760
  • MlStar2DReaderRoiYWidth = 860
  • MlStar2DReaderRoiZHeight = 80
  • MlStar2DReaderIlluminationSettings = “2;1;2;1;1;3;200"

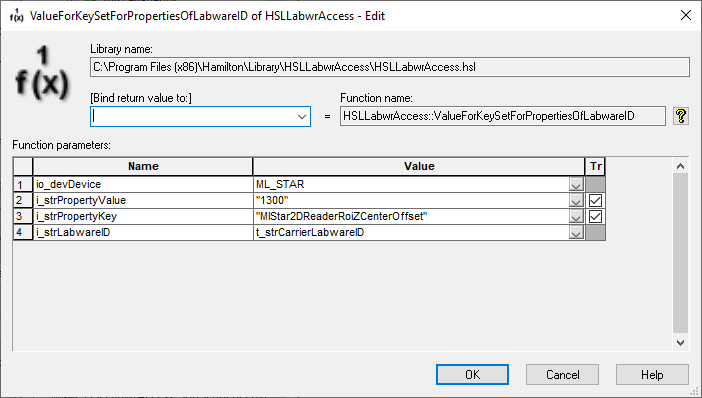
The first load of the carrier will read all of the bottom tier barcodes at each of the 5 sites. Prior to the second load of the carrier you use a command like ValueForKeySetForPropertiesOfLabwareID from the HSLLabwrAccess library to set the Z Center Offset to 1300 (from 760) to position the ROI for the top tier of stacked SkyFrames.

With 2 load commands you will have all 10 of your barcodes read and accounted for.

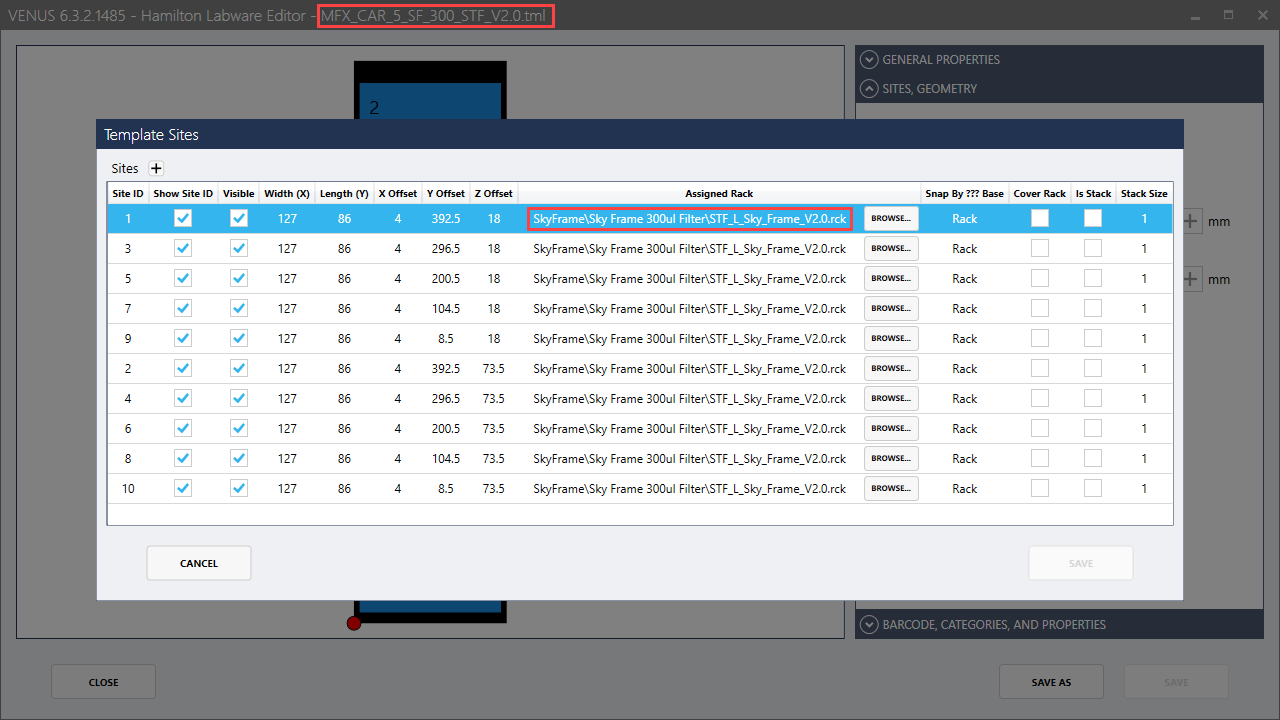
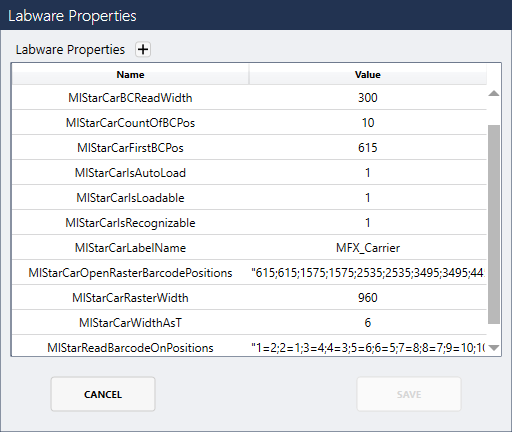
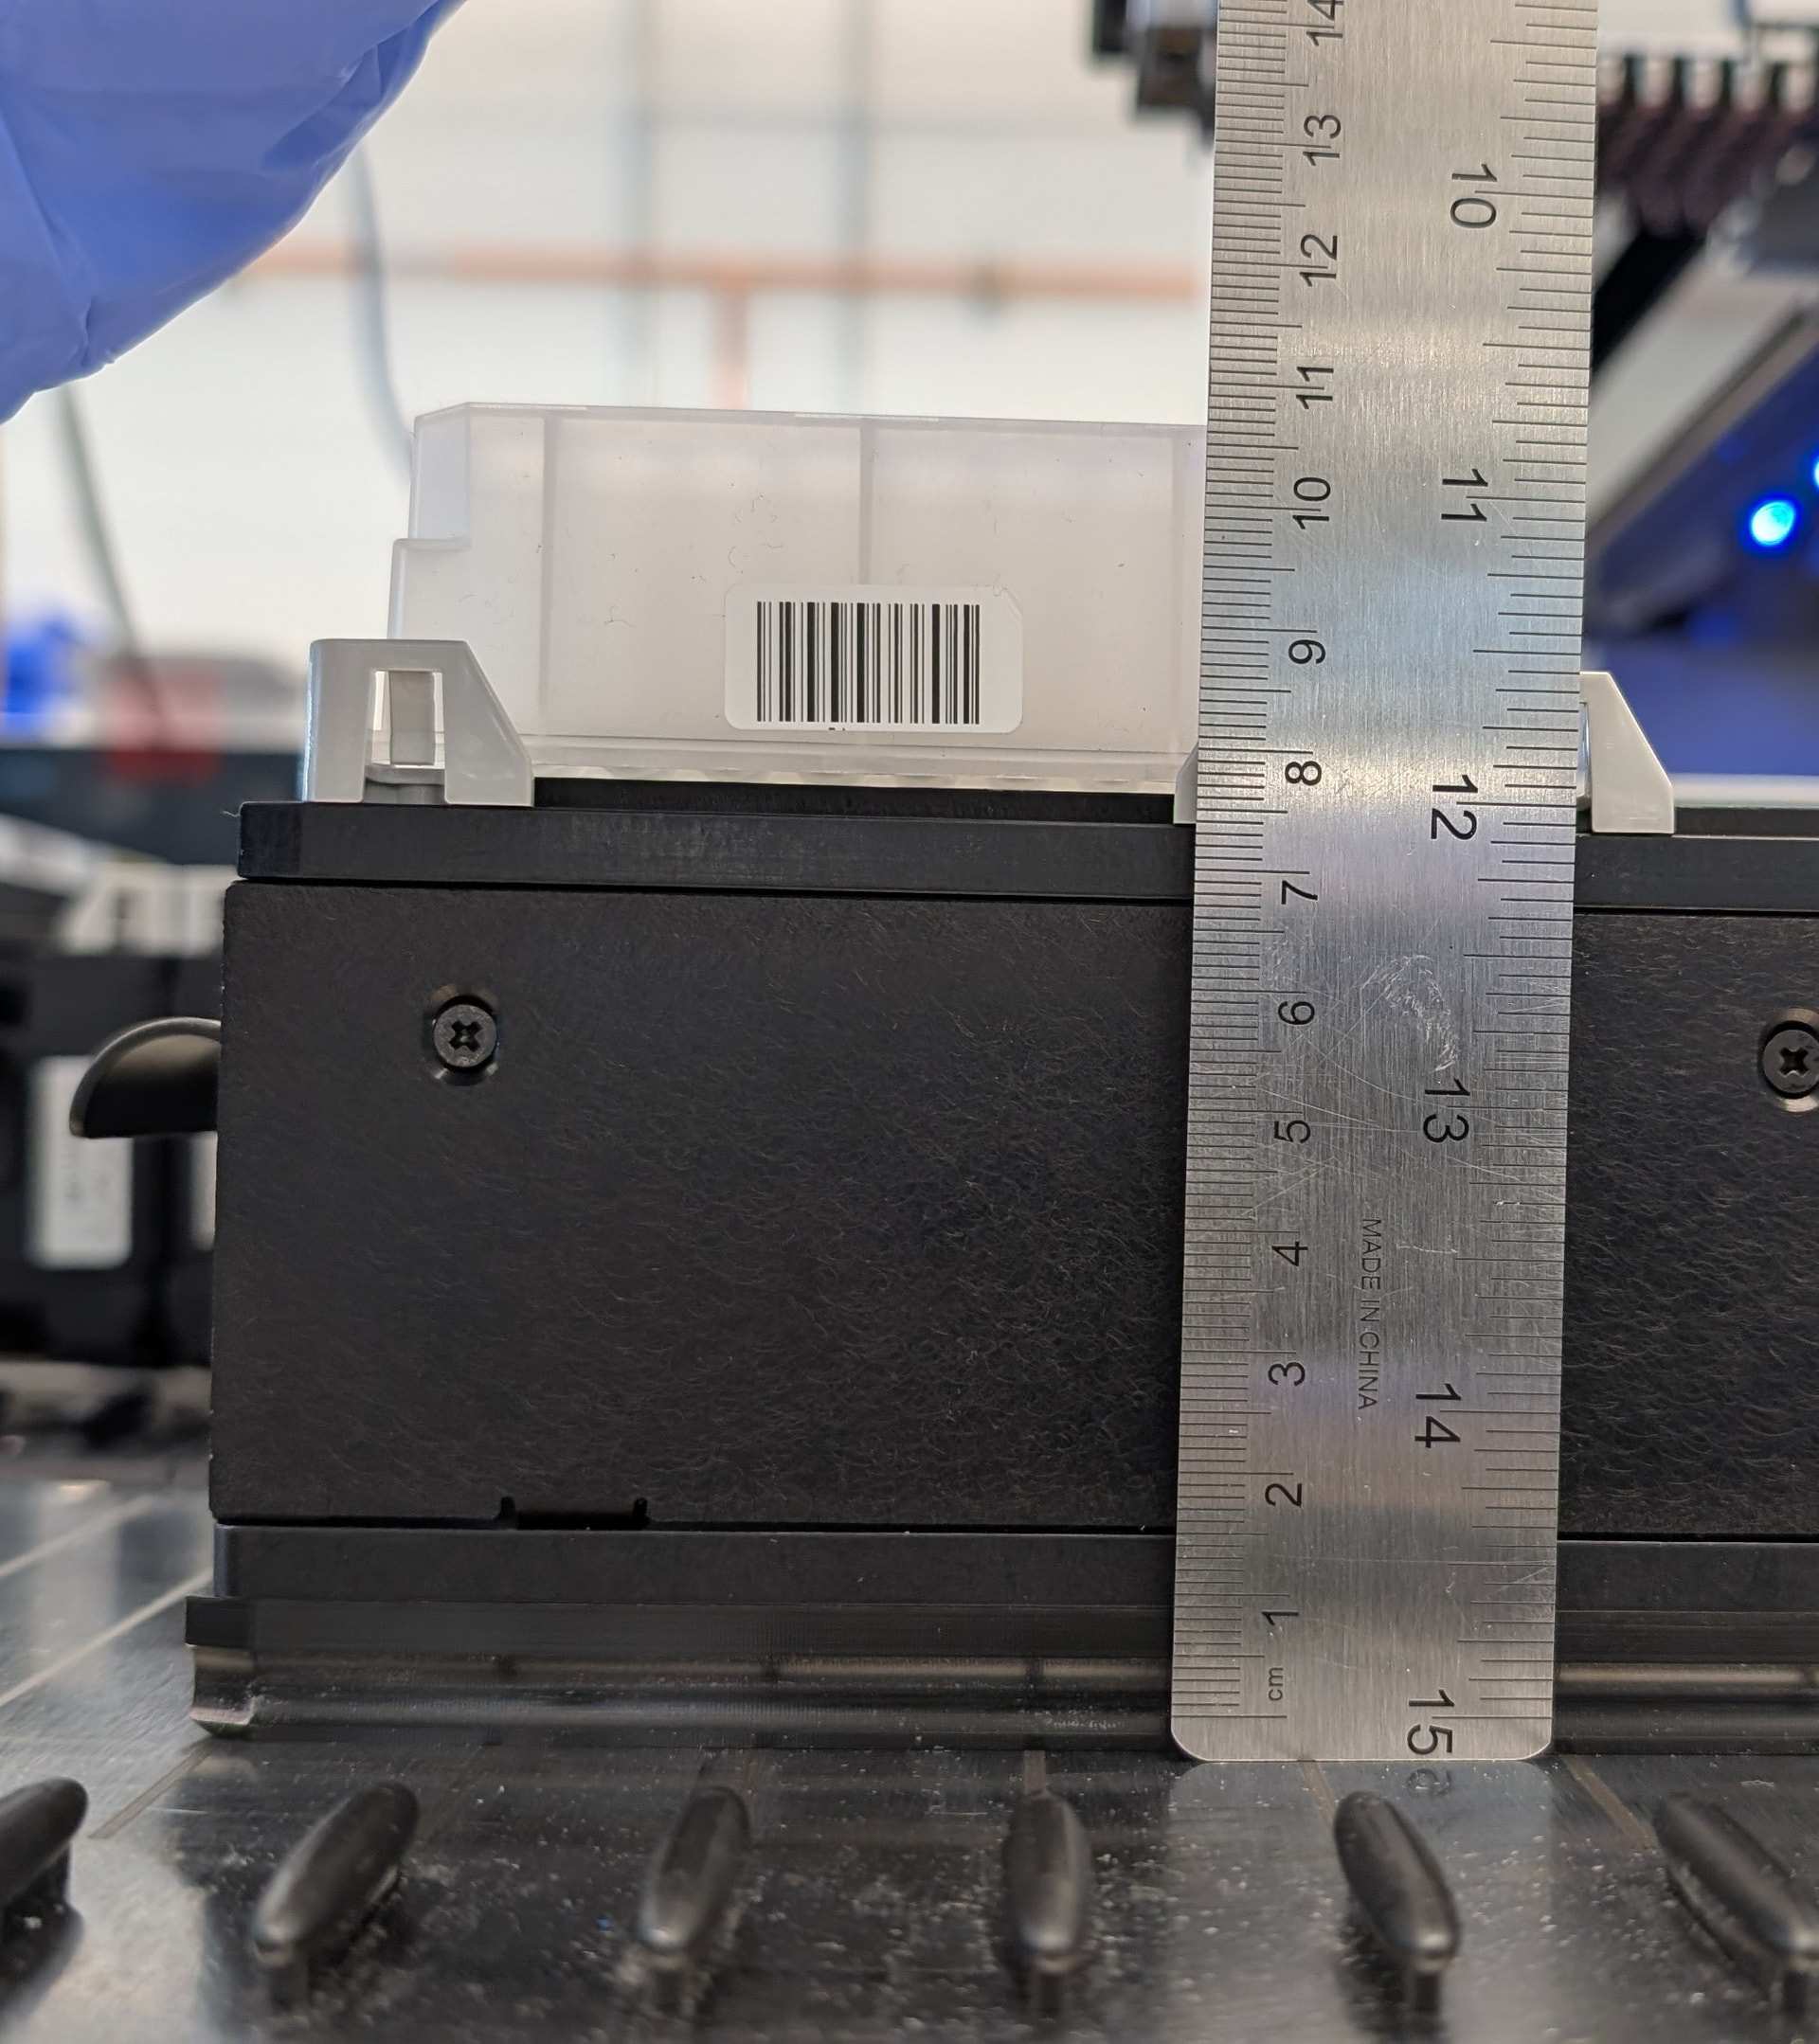
An alternative approach is quite a bit more complex but can scan all 10 barcodes in one single load command. The first thing to consider is that you will need a total of 10 positions specified for scanning so on the carrier MlStarCarCountOfBCPos will be 10 and MlStarCarOpenRasterBarcodePositions will have 10 values: “615;615;1575;1575;2535;2535;3495;3495;4455;4455”. However, MlStarCarOpenRasterBarcodePositions cannot have more values than the number of sites on the actual carrier labware definition - and since the default labware definition of the carrier only has 5 sites this will error at runtime. So the carrier must have 5 positions added to it. On top of that when you have one SkyFrame stacked on another they technically both occupy the same site of the carrier - so the stacks will have to go away as well. The result is a new carrier definition with 10 total sites where each site has a SkyFrame added to it:

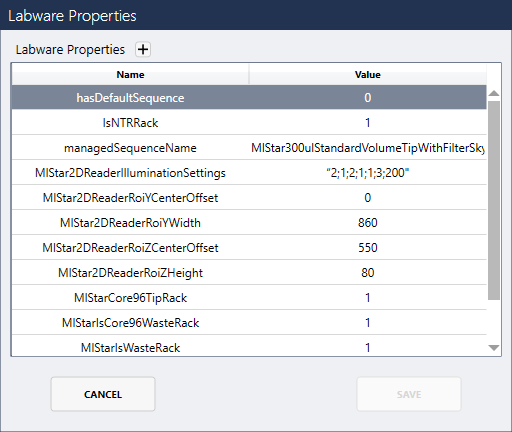
Note how in the above image I have created a new carrier and rack definition and just named them version 2.0 when the default definitions have version 1.X. I have also set that carrier’s labware properties as follows:

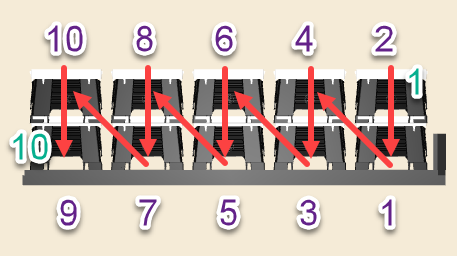
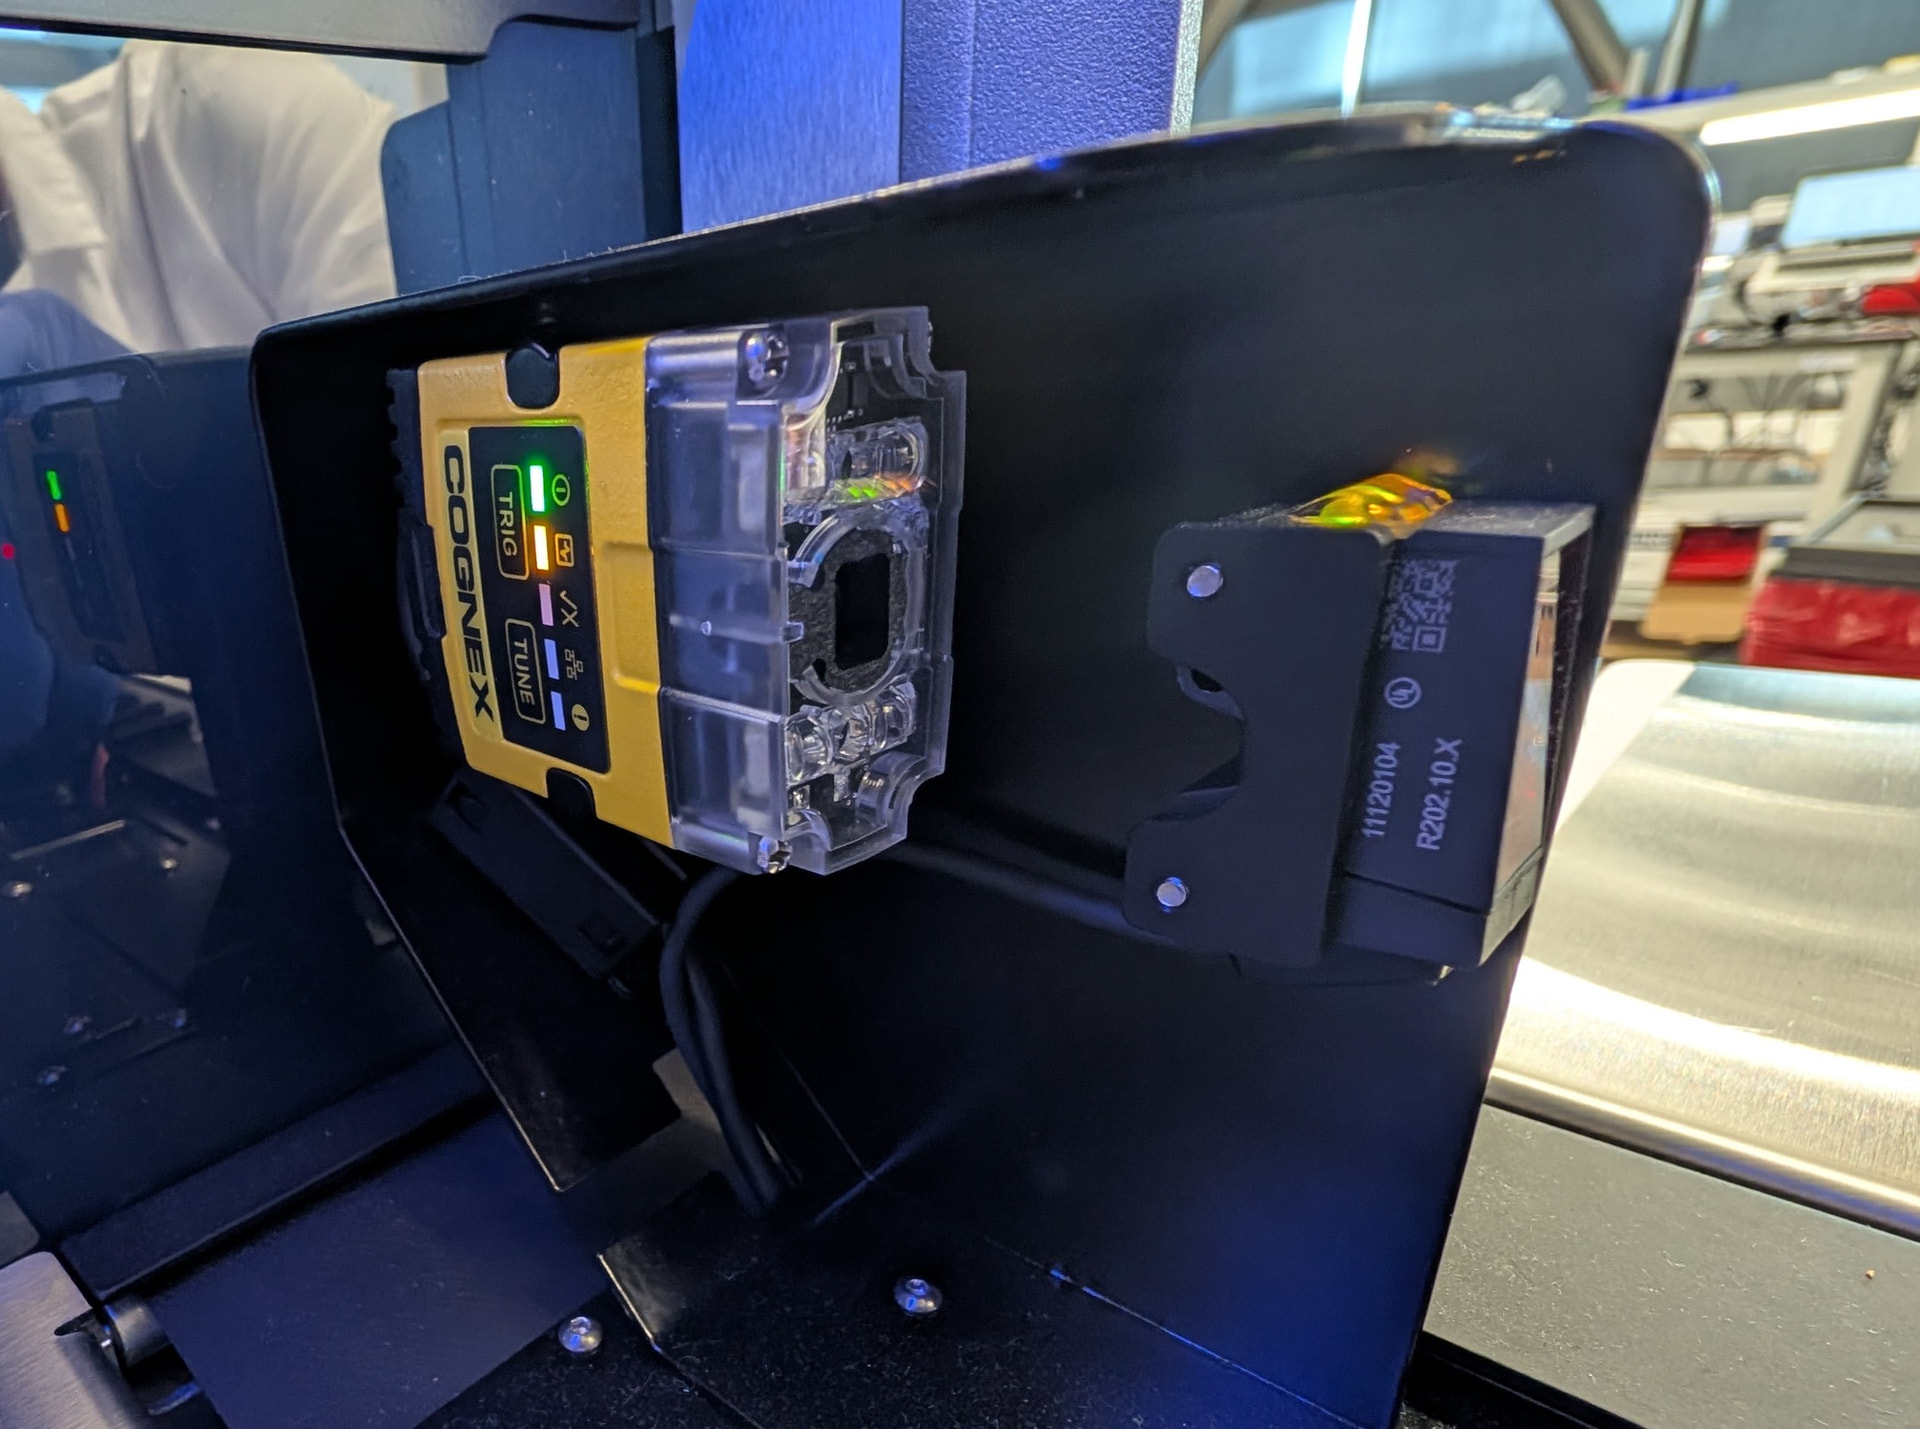
Setting MlStarReadBarcodeOnPositions to “1=2;2=1;3=4;4=3;5=6;6=5;7=8;8=7;9=10;10=9” is a very important part of getting the right barcodes to be assigned to the correct position. The left side of each expression is the position return (or rather the index of the barcode read as defined by how the reader functions) and the right side is the respective site string that that position points to. The image below shows red arrows that show the sequence that the barcode scanner will scan from 1 to 10 (in green text). The purple text shows the site labels as shown above in the new labware definition.

And the last things I set were each rack’s labware properties via the labware definition. This way I don’t have to add them to each labware via the deck layout editor. Note how the Z Center Offset is 550 (55mm) as this parameter is in reference to the base of the labware that this property is applied to (the rack in this case and no longer the carrier).

Calling a load command for the carrier will then scan each of the 10 SkyFrames or Tip Boxes in one single step. You can even go to the advanced section of the load command and specify any particular load string (ie “1,2,5,7,9,10”) and only those sites will be scanned.

There may be a downside to this though which would be that since the stacks are now no longer true stacks (where a labware on the deck layout is right clicked and “Add to Stack” is utilized), this may break the tip management library’s (ATML) tip counting logic for stacks of tips. So perhaps dummy labware and sequences can be utilized for loading the carrier and getting the barcodes and then an overlapping carrier of the original definition can be what is fed into the ATML for tip counting purposes and liquid handling commands.

Matt

5 Likes

Hi MatthewSmith_Hamilton,

Thank you for taking the time to test and write this. I will test what you’ve suggested, looks promising

Hello everyone! I appreciate everybody’s input on this, I’ve learned a lot. I have two problems of my own that I am trying to fix:

  1. DataMan software. I am confused as to how to use the software with a cognex being connected to Hamilton, instead of my PC. Inside the software I cannot connect to any scanners (I tried USB connection and RS-232). Are there tricks to connect?
  2. I am loading and scanning a tube rack and a plate carrier. I have no problem with tubes, and no problems with plates, as long as the barcode is higher on the plate. When the barcode is at the base of the plate, it doesn’t scan. I tried using MlStar2DReaderRoiZCenterOffset (tried 800) and MlStar2DReaderRoiZHeight properties (tried 400), but it feels as if it ignores them. No matter what I put there (even values outside of the range) it doesn’t scan. Any suggestions?

We have 152X model on a STAR, Venus 6. Many thanks!

1 Like

Hi @Oleksii,

Could you elaborate a bit more on your setup? As of today there are two styles of setup with a Cognex camera on the STARline platform. The current setup that ships with all STARline instruments today is one where the main autoload component IS the Cognex DM152Q camera model. The older setup is an upgrade to the 1D autoload scanner and a Cognex of some model is mounted to the front of it. It is the latter (older) setup that has Dataman capabilities - this is because the Cognex is NOT wired into the instrument and is connected directly to the pc instead. The current setup has the Cognex wired directly into the autoload board and has limited Cognex DMCC capabilities (and no functionality with Dataman).

Current model:

Old model:

In the event that you have the old model, the 2D autoload labware properties will not work - instead you should be working with the Cognex library and the Dataman software for barcode reading that you cannot successfully do with the 1D barcode scanning component.

But if you have the current model from the first picture then let’s take a look at your properties you mentioned:MlStar2DReaderRoiZCenterOffset of 800 and MlStar2DReaderRoiZHeight of 400, or rather 80mm and 40mm. I am going to assume you put these properties on the carrier and not the individual racks which is fine. On a standard deepwell plate carrier 80mm is just to the top of the carrier and where the plate starts. This is where you are specifying the middle of your barcode is. Then 40mm means 20mm above and below that mark. On a standard deepwell plate carrier this definitely won’t be in range for many taller plates that have their barcodes near the top of them.

2 Likes

@MatthewSmith_Hamilton Matt, thanks for a quick response! We have a new setup, where Cognex is primary scanner. Also, below is the pic of how I measure the height. My carrier is PLT_CAR_L5_DWP_J, but in the layout it is PLT_CAR_L5_DWP_D, can this make a difference? How can I verify that it reads 2D parameters on a carrier?

You mentioned a Cognex library, where can I get one? Also, what would you recommend as a next troubleshooting step? The DataMan software should work for the new setup, correct? Do you connect via a COM port, network, or RS-232?

Many thanks!

Hi @Oleksii,

The Cognex library and the Dataman software will not work with your setup. Your Cognex is wired directly into the autoload board.

The carrier type likely will not make a difference between Rev D and J as their plate locations should be the same. Looking at your first image I would right click and add the following labware properties to your carrier on the deck layout(not the individual racks):

  1. MlStar2DReaderRoiYCenterOffset - 0
  2. MlStar2DReaderRoiZCenterOffset - 950
  3. MlStar2DReaderRoiYWidth - 800
  4. MlStar2DReaderRoiZHeight - 300 or 400
  5. MlStar2DReaderIlluminationSettings - “1;2;1;2;1;3;200”

Try these out and let me know if they work for you.

Matt

2 Likes

@MatthewSmith_Hamilton

Good morning, Matt! I tried your values and, sadly, it didn’t work. Is there anything else I can try? thx

Hi @Oleksii,

The parameters I gave you are for the setup that I have gathered from your provided pictures:

  • Standard deepwell plate carrier
  • What looks to be an Abgene MIDI or comparable plate on the carrier
  • A C128 barcode that says “Storage”
  • VENUS 6 with at least 5.0S 11 2022-08-29 autoload firmware
  • A load command for the correct carrier with the aforementioned properties and a load string in the advanced portion of the load command that ensures that the site in question will be read (a plate only on site 5 should have a load string of at least “5” assuming that is the name of the site - they are if this is the standard carrier definition on your deck layout)

And again, the aforementioned labware properties on the carrier should be:

  • MlStar2DReaderRoiYCenterOffset - 0
  • MlStar2DReaderRoiZCenterOffset - 950
  • MlStar2DReaderRoiYWidth - 800
  • MlStar2DReaderRoiZHeight - 300 or 400
  • MlStar2DReaderIlluminationSettings - “1;2;1;2;1;3;200”

The one thing that could possibly need changing is the last one where the first 5 digits specify the 5 different lights on the autoload, the 6th digit is the gain factor of the image taken, and the last digit is the exposure time of the image taken.

Now you may also have other properties on the carrier that can make it so no barcodes are read. Why don’t you share an image of what labware properties you currently have.

Matt