Getting Started with PyHamilton

PyHamilton Reference Guide

Author: Stefan Golas (Contact stefanmgolas@gmail.com)

Contents

  • Intro
  • Installation
  • Your First PyHamilton Method
  • How PyHamilton Works
  • Expanding The API

Intro

PyHamilton is an open-source Python interface for programming Hamilton liquid-handling robots. PyHamilton is designed to be accessible while affording unlimited flexibility to the developer. We believe that an open-source community driven framework will accelerate discovery and enable a new generation of biological workflows.

Installation

  1. Install and test the standard Hamilton software suite for your system.

  2. Install 32-bit python <=3.9, preferably using the executable installer at Python Release Python 3.9.0 | Python.org. Python 3.10+ is known to cause an installation issue with some required pythonnet/pywin32 modules.

  3. Make sure git is installed. Git - Downloading Package

  4. Make sure you have .NET framework 4.0 or higher installed. https://www.microsoft.com/en-us/download/details.aspx?id=17851

  5. Update your pip and setuptools.

    > python -m pip install --upgrade pip
    > pip install --upgrade setuptools
    
  6. Install pyhamilton.

    pip install pyhamilton
    
  7. Run the pyhamilton autoconfig tool from the command line.

    pyhamilton-configure
    
  8. Test your PyHamilton installation

    The easiest way to test your PyHamilton installation is by running the following in your terminal

    mkdir new-project
    cd new-project
    pyhamilton-new-project
    py robot_method.py
    

Your First PyHamilton Method

Here is how to write your first PyHamilton method.

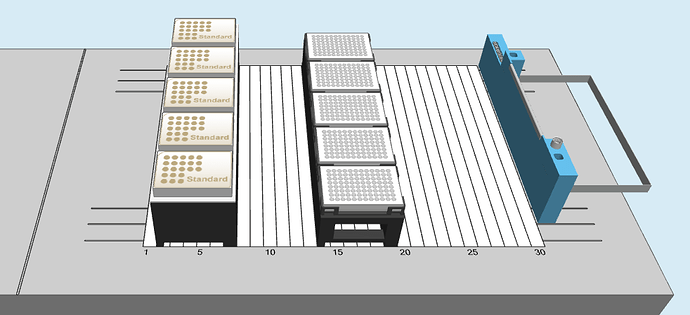
First, create a new directory called my-project. Then, open the Hamilton Method Editor and create a new Layout file. Add 5 96-tip tip holders named “tips_1”, “tips_2”, etc. Then add 5 96-well plates named “plate_1”, “plate_2”, etc.


deck.lay

Next, create a file named robot_method.py in your preferred text editor. Inside this file, paste this code chunk to import the necessary functions and classes from pyhamilton:

from pyhamilton import (HamiltonInterface,  LayoutManager, 
 Plate96, Tip96, initialize, tip_pick_up, tip_eject, 
 aspirate, dispense,  oemerr, resource_list_with_prefix)

Then, initialize your deck resources and declare a default liquid class. The LayoutManager class references the contents of a layfile to ensure that resource assignments in Python are consistent with the layfile.

lmgr = LayoutManager('deck.lay')
plates = resource_list_with_prefix(lmgr, 'plate_', Plate96, 5)
tips = resource_list_with_prefix(lmgr, 'tips', Tip96, 5)
liq_class = 'StandardVolumeFilter_Water_DispenseJet_Empty'

Make sure the liquid class in an aspiration step matches the tip type.

Now that your deck resources are initialized, let’s specify some aspiration and dispense patterns. These will convey the same information as sequences in Venus, but are lists of well indexes rather than static references to a predefined object. An aspiration pattern will be a list of 2-tuples where the first element is a Plate object and the second element is an integer. The length of this list is always 8, and positions in the aspiration pattern specify channels. Unused channels will have a None at that position in the list.

#Example aspiration pattern
#aspiration_poss = [(Plate96, 0), (Plate96, 1), (Plate96, 2), None, None, None, None, None]
#vols = [100, 100, 100, None, None, None, None, None]

aspiration_poss = [(plates[0], x) for x in range(8)]
dispense_poss = [(plates[0], x) for x in range(8,16)]
vols_list = [100]*8

List comprehensions are very convenient tools for specifying liquid-handling patterns. Let’s also specify which tips we’re going to use.

tips_poss = [(tips[0], x) for x in range(8)]

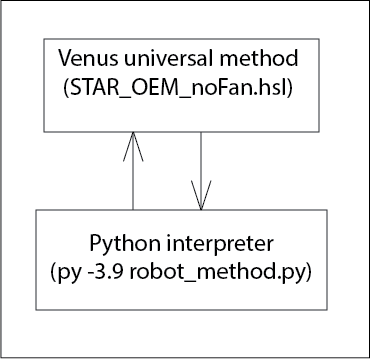
Now we are ready to enter the PyHamilton interface. We’re going to use simulation mode this time. The HamiltonInterface class spawns a subprocess which starts a server that communicates with the Venus universal method (STAR_OEM_noFan.hsl). We must instantiate this inside the if __name__ == '__main__' guard.

if __name__ == '__main__': 
    with HamiltonInterface(simulate=True) as ham_int:
        initialize(ham_int)
        

Finally, let’s add functions that run our aspiration and dispense patterns. aspirate and dispense functions take parallel lists of length 8 of aspiration patterns and volumes that specify the activity of each channel.

if __name__ == '__main__': 
    with HamiltonInterface(simulate=True) as ham_int:
        initialize(ham_int)
        tip_pick_up(ham_int, tips_poss)
        aspirate(ham_int, aspiration_poss, vols_list, liquidClass = liq_class)
        dispense(ham_int, dispense_poss, vols_list, liquidClass = liq_class)
        tip_eject(ham_int, tips_poss)

Our robot_method.py file should now look like this:

from pyhamilton import (HamiltonInterface,  LayoutManager, 
 Plate96, Tip96, initialize, tip_pick_up, tip_eject, 
 aspirate, dispense,  oemerr, resource_list_with_prefix)

liq_class = 'StandardVolumeFilter_Water_DispenseJet_Empty_with_transport_vol'


lmgr = LayoutManager('deck.lay')
plates = resource_list_with_prefix(lmgr, 'plate_', Plate96, 5)
tips = resource_list_with_prefix(lmgr, 'tips', Tip96, 5)
liq_class = 'StandardVolumeFilter_Water_DispenseJet_Empty'

aspiration_poss = [(plates[0], x) for x in range(8)]
dispense_poss = [(plates[0], x) for x in range(8,16)]
vols_list = [100]*8

tips_poss = [(tips[0], x) for x in range(8)]


if __name__ == '__main__': 
    with HamiltonInterface(simulate=True) as ham_int:
        initialize(ham_int)
        tip_pick_up(ham_int, tips_poss)
        aspirate(ham_int, aspiration_poss, vols_list, liquidClass = liq_class)
        dispense(ham_int, dispense_poss, vols_list, liquidClass = liq_class)
        tip_eject(ham_int, tips_poss)
        

robot_method.py

my-project
│   deck.lay
│   robot_method.py 

Project directory

Once your script looks like the one above, you can run it from the command line with py robot_method.py.

Troubleshooting

  1. If you encounter a “silent error” such as your initialization hanging, or your script crashing without a specific reason, or an unclear error code, try to run your script with HamiltonInterface(simulate=True). This will run PyHamilton with Run Control open in a window rather than in the background. From here you can turn simulate on or off in Run Control, and monitor the execution of your script. In rare cases, Run Control throws errors that are not visible at the Python level.

  2. If you encounter an error relating to HxFan (i.e., your robot does not have a fan), open pyhamilton/star-oem/VENUS_Method/STAR_OEM_Test.med, navigate to the “HxFan” grouping, and delete all commands under this grouping.

  3. If you would like to test your PyHamilton installation on a computer not connected to a Hamilton robot, use HamiltonInterface(simulate=True) to open your interface inside your robot script.

  4. If your initialization hangs (such as on initial_error_example.py), try these steps:

    a. Make sure you don’t have any other program running which is communicating with the robot e.g. Venus run control

    b. Make sure the .dlls referenced in __init__.py are unblocked. See this StackOverflow thread for more details.

  5. Instrument configuration errors can arise right when you start a method, and can call PyHamilton to fail silently if not in “simulate” ie windowed mode. To fix this, make sure to reference a Layfile with the LayoutManager tool that you know works on your robot, before you instantiate the HamiltonInterface class. You can also manually copy this file into pyhamilton/pyhamilton/star-oem/VENUS_Method/STAR_OEM_Test.lay
3 Likes

How PyHamilton Works: The Very Basics

You’ve seen what PyHamilton does: it lets you talk to a Hamilton robot using a normal Python script. But how does it do that?

Deck layout

At the highest level, the two components of PyHamilton are the Python interpreter and the Venus universal method. These run continuously during a PyHamilton script, communicating with each other during the life of the interface. Commands are described in Python, formatted and sent as a data packet from a server, and received by a server hosted from the Venus universal method. This Venus method then processes these packets into actual commands executed by the robot.

Relationship to Venus

PyHamilton can be thought of as an application layer that engages with Venus. Every command from PyHamilton to the robot goes through Venus as a typical Venus command. This means that many of the features and techniques familiar to Venus programmers will be applicable in PyHamilton.

Here are some of the main Venus features used in PyHamilton:

  • Layfiles: PyHamilton exclusively references Venus layfiles at the moment. You will set up the deck just as you would normally in Venus except you will not have to declare sequences.

  • Libraries: The Venus universal method imports a lot of library code for special functionality

  • Liquid classes: PyHamilton uses the exact same liquid classes as Venus

  • Errors: Errors that would occur in Venus occur in exactly the same way in PyHamilton. Remember to run PyHamilton in windowed (also called simulation) mode if you are unsure of why an error is occuring.

If you’re a Venus programmer who isn’t a Python expert, you will want to learn a few basic topics addressed in the next section.

Relationship to Python

Python lets us write reusable, modular code that is easily editable from a text editor. The world of Python is infinite. Web applications, databases, machine learning, systems integration. Anything that can be done by a computer can be done with Python. It’s also relatively easy to read and understand, so beginners can learn quickly.

Here are some important Python concepts used in PyHamilton:

  • List comprehensions: An easy way to automatically create a list with one line of code

  • Functions: Small containers for reusable code

  • Objects and classes: Objects are containers for code and data. Classes define objects.

  • Libraries: A big container with many functions and classes.

  • PyHamilton: PyHamilton is a small library that does a lot! The source code is your friend.

These are very broad concepts and we can’t enumerate everything you’ll need in great specificity. Google is often extremely helpful. Python might be easy compared to other programming languages, but programming can be a challenging discipline. Remember that programming of any kind is useful across almost all technical fields as you learn and troubleshoot your code.

3 Likes

Executing a Script: Data Flow to the Robot and Back

As you build scripts and extend the API, you’ll want to keep in mind how data moves between the layers of PyHamilton.

First we have command functions like aspirate or dispense. These are functions that let you interact with the robot in easily understandable ways. This is called “high-level” in programming. You are not usually thinking of the implementation details when you write high-level code.

aspirate
Example of a high-level command

These high-level commands are wrappers around code that sends your command to HamiltonInterface object. They implement basic error-checking, send your command to the interface, and wait until a response is received before continuing to the next command. This pattern of waiting for a response after sending a command is sometimes called “asynchronous”.

The HamiltonInterface formats the command into JSON, a widely-used data format, and sends the JSON string to the server hosted by the Venus universal method. The universal method will parse the JSON string to determine exactly what command to execute along with its associated parameters.

    'channelAspirate':('ASPIRATE', {
        'aspirateSequence':'', # (string) leave empty if you are going to provide specific labware-positions below
        'labwarePositions':'', # (string) leave empty if you are going to provide a sequence name above. 'LabwareId1, positionId1; LabwareId2,positionId2; ....'
        'volumes':None, # (float or string) enter a single value used for all channels or enter an array of values for each channel like [10.0,15.5,11.2]
        'channelVariable':_channel_patt_16, # (string) channel pattern e.g. "11110000"
        'liquidClass':None, # (string)
        'sequenceCounting':0, # (integer) 0=don´t autoincrement,  1=Autoincrement
        'channelUse':1, # (integer) 1=use all sequence positions (no empty wells), 2=keep channel pattern
        'aspirateMode':0, # (integer) 0=Normal Aspiration, 1=Consecutive (don´t aspirate blowout), 2=Aspirate all 
        'capacitiveLLD':0, # (integer) 0=Off, 1=Max, 2=High, 3=Mid, 4=Low, 5=From labware definition
        'pressureLLD':0, # (integer) 0=Off, 1=Max, 2=High, 3=Mid, 4=Low, 5=From liquid class definition
        'liquidFollowing':0, # (integer) 0=Off , 1=On
        'submergeDepth':2.0, # (float) mm of immersion below liquid´s surface to start aspiration when using LLD
        'liquidHeight':1.0, # (float) mm above container´s bottom to start aspiration when not using LLD
        'maxLLdDifference':0.0, # (float) max mm height different between cLLD and pLLD detected liquid levels
        'mixCycles':0, # (integer) number of mixing cycles (1 cycle = 1 asp + 1 disp)
        'mixPosition':0.0, # (float) additional immersion mm below aspiration position to start mixing
        'mixVolume':0.0, # (float) mix volume

JSON string format for command packets

Parameters from the JSON packet are passed to a function in Venus imported from STAR_OEM_Toolkit.smt. This is a sub-method library that wraps basic Venus functions like aspirate (Venus command) with basic error handling. Finally, the results of the Venus command (whether a success or failure) is passed back up the chain to fulfill the wait-on-response loop.

2 Likes

Extending the API

Now that you know how data moves from a script to the robot and back in PyHamilton, you can add additional commands to the API to interact with the equipment your robot uses. Not all equipment is appropriate for adding to the PyHamilton API. Many pieces of equipment can be integrated with a library or module completely separate from PyHamilton. In general, if equipment is manufactured by Hamilton it will be integrated directly into the PyHamilton API, and if it’s manufactured by a 3rd-party vendor then it will be integrated with a separate module.

Before we start, make sure to have a Hamilton library that provides commands to the piece of equipment being used. We will repeat the below steps for every separate command to a piece of Hamilton equipment.

1. Add function to STAR_OEM_Toolkit.smt

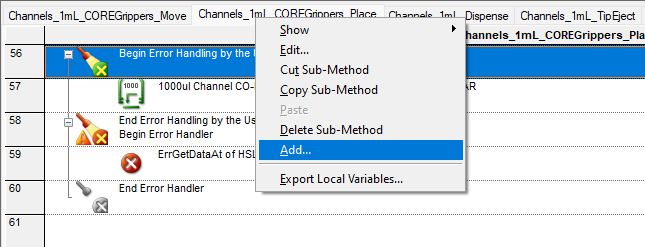
First we have to add a sub-method to the toolkit. Right-click the top bar where functions are listed in tabs such as “Channels_1mL_Dispense” and select “Add…”.

Deck layout

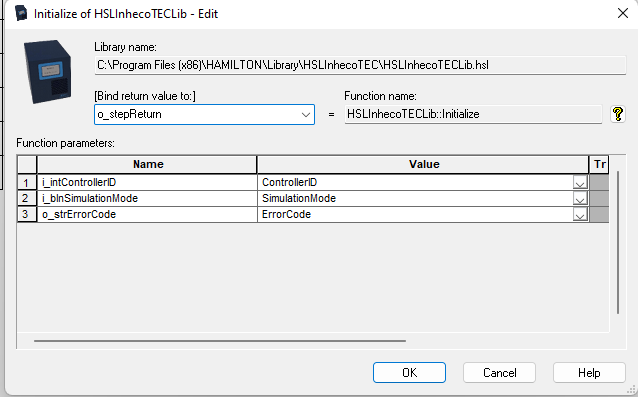
In the “Define Sub-method” window add input parameters that match those of your equipment function. Make sure to specify Return value as variable in the top-right and include an o_stepReturn output parameter


Then, import the equipment function from its library and wrap it in an error handling function. The easiest way to do this is copy+pasting the error handling from another sub-method; they all have the exact same wrapper.


Parameterize the equipment function with the same variables that you assigned as inputs to the sub-method itself by selecting from a drop-down menu.

Deck layout

2. Add function from STAR_OEM_Toolkit to STAR_OEM_noFan.hsl

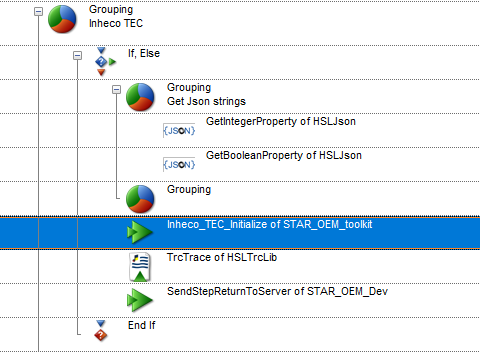
Import the equipment function from the STAR_OEM_Toolkit sub-method library into STAR_OEM_noFan.med (or .hsl). Enclose it in a conditional commandFromServer == 'command' and extract input parameters from the JSON packet. Add a SendStepReturnToServer function at the end to pass your o_StepReturn output back to the HamiltonInterface server.

Deck layout

3. Edit defaultcmds.py

Add a key-value pair to the dictionary defaults_by_cmd structured as

    'TEC_Initialize':('TEC_INIT', {

        'ControllerID':'', # (integer)
        'SimulationMode':False, # 0=False, 1=True; 
    }),

where the key is the name of the command string in the conditional commandFromServer == 'command' in the Venus universal method, and the parameters dictionary provides the parameters parsed in the universal method.

4. Create a wrapper in utils.py

from .interface import TEC_INIT
# ...

def inheco_initialize(ham, asynch=False, **more_options):
    logging.info('Initialize the Inheco TEC' +
            ('' if not more_options else ' with extra options ' + str(more_options)))
    cmd = ham.send_command(TEC_INIT, **more_options)
    if not asynch:
        ham.wait_on_response(cmd, raise_first_exception=True)
    return cmd

You’re done! Now you can import inheco_initialize from PyHamilton and run that function in a Python script.

1 Like

Creating an Equipment Integration Module in Python

If the equipment you are integrating is not manufactured by Hamilton, you may want to write your equipment integration as a separate module in Python. This is harder to provide a specific playbook for because you are starting from scratch, rather than importing functions from a pre-written library in Venus. Still, there are some common patterns.

shaker-module
│   __init__.py
│   shaker.py

A folder with __init__.py defines a module in Python

class PyShaker:

    def __init__(self, comport):
        
        self.interface=serial.Serial(comport, 9600, timeout=1)
        
    def _send_command(self, cmd_string):
        cmd_string = cmd_string + " \r"
        command = bytes(cmd_string, encoding='utf-8')
        self.interface.write(command)
        return self.interface.readline()
        
    def start(self, rpm=100, ramp_time=10):
        er = self._send_command("V" + str(rpm))
        er = self._send_command("A" + str(ramp_time))
        er = self._send_command("G")
        time.sleep(ramp_time)
    
    def stop(self):
        er = self._send_command("S")
    
    def get_speed(self):
        er = self._send_command("?W")

A class that provides a firmware interface to a Shaker

We use __init__.py in the module folder to define the module. This file should import all functions from the other files in the module with from shaker import *. Each piece of equipment should be defined by a class that exposes methods that perform each of the high-level functions that a user would perform in a script.

These high-level functions run code that talks directly to your piece of equipment through that equipment’s API. This API will (should) be documented by the manufacturer. Almost all equipment APIs conform to one of two patterns, ActiveX/.NET and firmware.

ActiveX / .NET API

Equipment manufacturers often provide libraries for interacting with their equipment in ActiveX or .NET frameworks. An API in one of these frameworks will expose high-level functions that should cover all of your needs for interactivity. All you need to do is load the provided library into Python. For ActiveX this is done using the win32com library to run something like excel = win32com.client.Dispatch("Excel.Application") where the excel variable will contain the interface to the equipment.

For interacting with .NET APIs (usually provided as .dlls) you will use the clr module from the pythonnet library. Imports will look something like this: clr.AddReference("System.Windows.Forms") followed by from System.Windows.Forms import Form.

Firmware string API

Some manufacturers don’t provide libraries at all, and commands are sent as firmware strings over a USB connection. In this case you will have to reference the manufacturer’s documentation for mapping strings to commands. Remember to use end-of-line delimiters when formatting your command strings. The most common libraries for this purpose will be PySerial or PyUSB.

Other types of APIs

The above list covers many but not all APIs that automation equipment uses. Other frameworks include modbus, HTTP, and others. Python should have libraries for facilitating communication with all of these frameworks.

3 Likes

I’m excited about trying this!

I have a question about pyHamilton. One big issue I’ve run into when developing with Venus is that run recovery needs to be built into the method, which can significantly increase development and testing time. Run recovery is especially important for long assays with sensitive and expensive materials. Does pyHamilton provide an easier way to build this in?

2 Likes

@RitaV Yes that’s certainly possible, I’ve created a few programs that do that.

Essentially you want your program to write data to a separate file that keeps track of what it needs to remember in case you are restarting. This can look something like:

{tip_num: 75,
well_num: 54,
plate_num: 3} 

In Python you can supply additional arguments to a command-line command that are parsed within a script. For instance, we can run py robot_method.py --error_recovery and inside the script we’ll have a routine triggered by if '--error_recovery' in sys.argv: .

This might look something like:

import sys

if '--error_recovery' in sys.argv:
     tip_num, well_num, plate_num = parse_recovery_file('recovery_data.txt')

sys.argv interprets all of the arguments after the script command as a list of strings. So, py script.py a b c will result in print(sys.argv) outputting ['a','b','c']

Ok awesome. I’m doing something similar in Venus where - like you - i track a bunch of variables including well location, plate number, the step in method that failed and some flags like whether a step completed or the run completed. Then i write everything to a file and parse it at the beginning of the run. I use a lot of if/thens to manage all this and it’s cumbersome. I wonder if this would be easier to manage with pyHamilton. I’d like to standardize this more.

Yes, just about anything to do with file parsing is much easier in PyHamilton

Thanks so much for this Stefan! I’ve been longing to use PyHamilton for a while. Never was able to find the “your first method” section on the GitHub though, so I was always a bit lost!

I’m sure I’ll have more questions in the future, but this will definitely get me on track :slight_smile:

If you run pyhamilton-new-project from the command line you can instantiate a working project template (the same as is in the tutorial) that you can then run with py robot_method.py

I have everything installed and working now. Yay! I had to disable checksums though. I’ll keep you posted as I play around with it. I’m sure I’ll have questions!

2 Likes

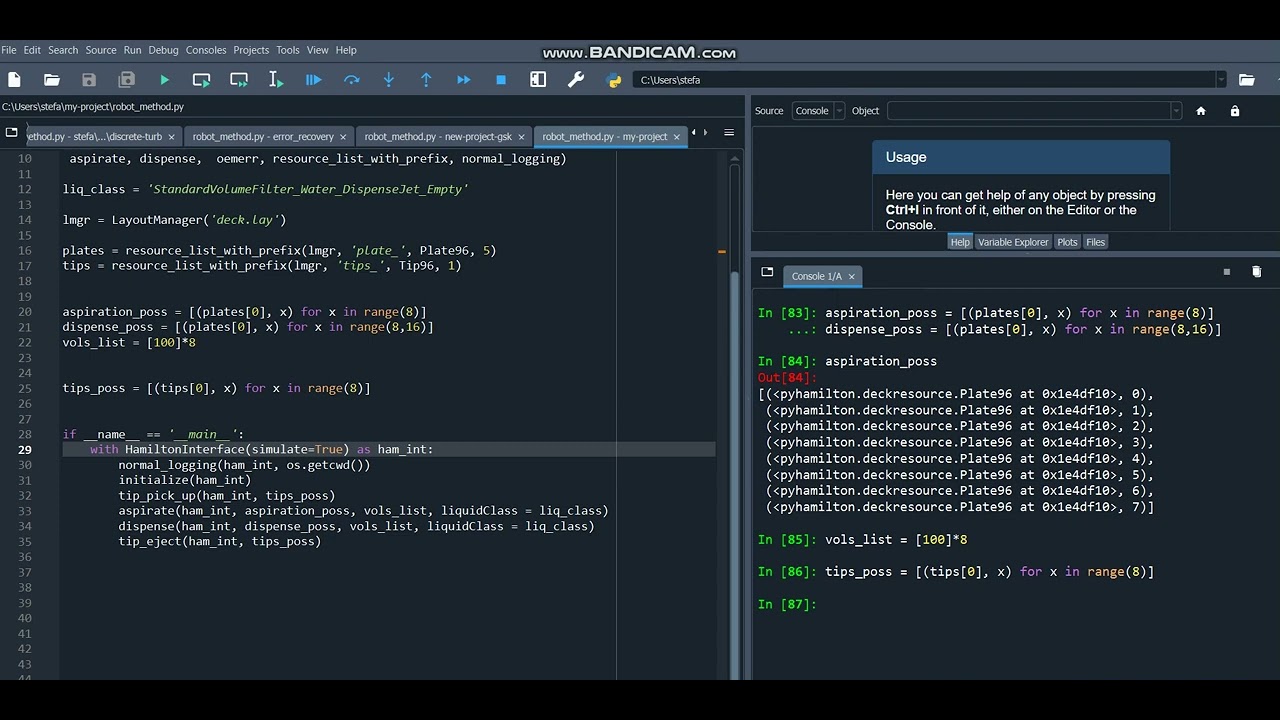
We now have a video to supplement this tutorial

5 Likes

2 posts were split to a new topic: Method contains syntax errors

2 posts were split to a new topic: Defining newlabware definitions

Nevermind about the documentation, I found it! :rofl: :rofl:

1 Like

Hello! Since I have been learning PyHamilton mostly through trial and error, I thought it would be applicable to make a bit of a repository regarding some stumbling blocks that I ran into as a novice. I thought about making a new thread, but I think that this thread seems like an appropriate place to put them. Stefan, please feel free to correct anything if what I say is not 100% correct - I am still figuring this out after all!

Documentation and Example Protocols
The developers have put ample time and effort into developing this platform! This includes the online documentation that can be found here. I highly suggest you read it as it can answer a lot of your questions as to how things work. Also worth noting is the fact that Stefan has detailed some example protocols at the top of this forum post as well as here and here. Check them out, as they’re a great way to learn the syntax :slight_smile:

The “Waste” sequence.

  • While PyHamilton does not require sequences to perform liquid handling, Stefan has taught me that a sequence called “Waste” is a requirement for PyHamilton to function. This is a default sequence created with any new .layfile, but if you, like me, delete the sequence without thinking twice about then just create a new one. Eject tips to waste by passing the argument useDefaultWaste=1.

Length Padding

  • Arguments to the aspirate, dispense, tip_pick_up and tip_eject commands do not strictly have to be of length 8. This means that your position-tuples (arg: pos_tuples) and volumes (arg: vols) do not necessarily need to be padded to a length of 8 with None, thought it is probably “poor form” not to do so!

assert_parallel_nones: lists must have parallel None entries

  • This generally happens in an aspirate or dispense command where your position-tuples and your volumes list do not have the same structure.

  • At first I thought that this meant that all Nones within each list had to be sitting next to each other, such as [10, 10, 10, 10, 10, 10, None, None]. This is not the case. Your None values within any one list are allowed to sit wherever you would like. This is great as it means you can freely turn channels on and off as you please.

  • What the assert_parralel_nones error is really referring to is the fact that the two arguments, pos_tuples and vols, must have None at the same indexes. Again, the arguments do not have to have a length of 8, provided they have the same structure.

ResourceUnavailableError: No unassigned resource of type XXX available.

  • This generally happens when initializing labware using resource_list_with_prefix.

  • To have PyHamilton recognise the labware you would like to interact with, it is essential to give the labware a name, as this name will be the identifier used to locate the labware. Less obvious, however, is that your labware names need to have a prefix and a suffix and have to be of the form “prefix_suffix”.

  • Generally, the prefix will be something descriptive, like “plate” or “EppiCarrier”, while the suffix is generally an ordinal character such as 1/2/3 or a/b/c.

  • Note that this notation is enforced even if you only have a single piece of the labware! If I had a single plate on deck then it is required to be e.g. “plate_1”, as just calling it “plate” would throw the ResourceUnavailableError.

  • I have not been able to find locate the source code for resource_list_with_prefix, but I am almost certain that there is a .split(’_’) being performed on the labware IDs, hence the required name structure.

I will continue to keep a personal log of learnings such as those above, if others find them useful then I will post them every now and then!

2 Likes

This is awesome, thanks! It’s really useful to understand what challenges and questions new users encounter. Also, resource_list_with_prefix is in the regrettably named utils.py file, so:

def resource_list_with_prefix(layout_manager, prefix, res_class, num_ress, order_key=None, reverse=False):
    def name_from_line(line):
        field = LayoutManager.layline_objid(line)
        if field:
            return field
        return LayoutManager.layline_first_field(line)
    layline_test = lambda line: LayoutManager.field_starts_with(name_from_line(line), prefix)
    res_type = ResourceType(res_class, layline_test, name_from_line)
    res_list = [layout_manager.assign_unused_resource(res_type, order_key=order_key, reverse=reverse) for _ in range(num_ress)]
    return res_list

A post was split to a new topic: Function must return value

Hello,
I think there is a mistake for 7. Run the pyhamilton autoconfig tool from the command line. : it’s pyhamilton-configure instead of pyhamilton-config

2 Likes